在 Elasticsearch 的使用中,我们常常会遇到各种复杂的排序需求。
本文将围绕一个企业级实际场景,详细介绍如何使用 Elasticsearch 8.X 实现按特定时间档次和相关度进行排序的功能。
一、问题描述
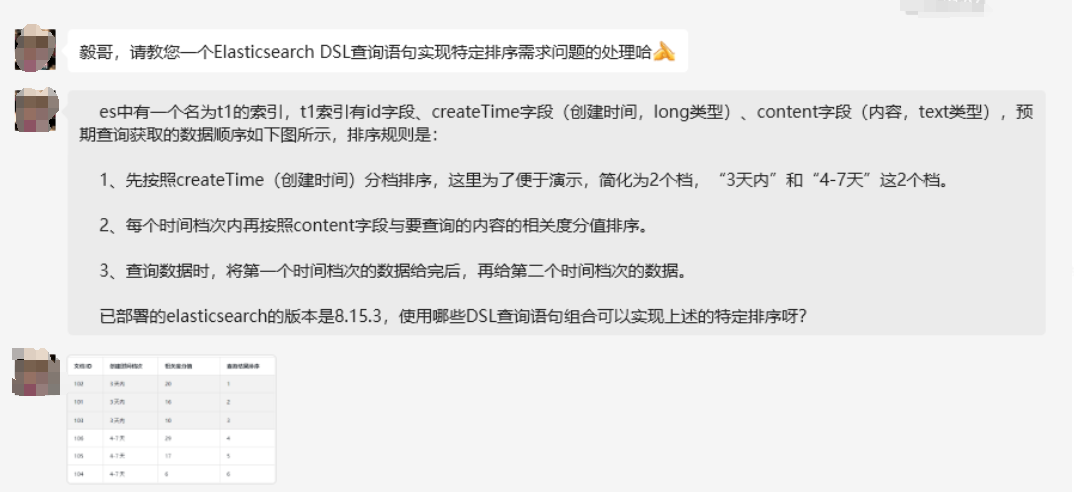
假设我们有一个名为 t1 的索引,该索引包含以下字段:
id:类型为 keyword,作为唯一标识符。
createTime:类型为 date,格式为 yyyy – MM – dd,表示文档的创建时间。
content:类型为 text,用于存储文本内容,支持全文搜索。
time_bucket:类型为 integer,这是一个预计算字段,用于分档。
我们的排序需求如下:
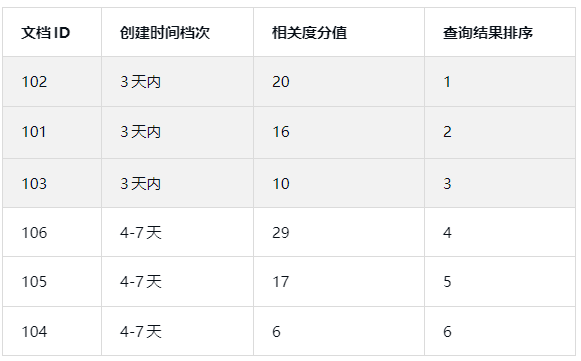
1、时间档次排序:将时间分为“3 天内”、“4 – 7 天”等档次。具体来说,3 天内对应 time_bucket = 1;4 – 7 天内对应 time_bucket = 2;7 天前对应 time_bucket = 3(可按需调整)。
2、相关度排序:在每个时间档次内,按 content 字段与查询内容的相关度分值进行降序排序。
3、查询结果顺序:先展示 time_bucket = 1 的文档,再展示 time_bucket = 2 的文档,依此类推。
期望结果如下:
二、解决方案概述
为了高效实现上述排序需求,我们采取以下优化方案:
1、预计算 time_bucket 字段:在文档索引时,根据 createTime 字段计算并存储 time_bucket 字段,避免在查询时进行复杂的脚本计算 。
2、设计合理的映射:确保 createTime 为 date 类型,time_bucket 为 integer 类型,以实现高效排序。
3、使用 Ingest Pipeline:在文档索引过程中,通过 Painless 脚本计算 time_bucket 字段的值。
4、优化查询语句:查询时,先按 time_bucket 升序排序,再按 _score(相关度分值)降序排序,实现分档和相关度的双重排序。
三、详细实现步骤
(一)定义 Ingest Pipeline
首先,我们要创建一个 Ingest Pipeline,用于在文档索引时计算并添加 time_bucket 字段。由于 Painless 脚本在 Elasticsearch 中有一些限制,我们避免使用 import 语句,改用受支持的功能进行日期解析和计算。
PUT _ingest/pipeline/add_time_bucket
{
    "description": "根据 createTime 添加 time_bucket 字段",
    "processors": [
        {
            "script": {
                "lang": "painless",
                "source": """
                    // 创建 SimpleDateFormat 实例
                    def sdf = new SimpleDateFormat("yyyy - MM - dd");
                    sdf.setTimeZone(TimeZone.getTimeZone("UTC"));

                    // 解析 createTime 字段
                    def createDate = sdf.parse(ctx.createTime).getTime();

                    // 获取当前时间的毫秒数
                    def now = System.currentTimeMillis();

                    // 计算日期差异(以天为单位)
                    def diffDays = (now - createDate) / (1000 * 60 * 60 * 24);

                    // 设置 time_bucket
                    if (diffDays <= 3) {
                        ctx.time_bucket = 1;
                    } else if (diffDays <= 7) {
                        ctx.time_bucket = 2;
                    } else {
                        ctx.time_bucket = 3;
                    }
                """
            }
        }
    ]
}
上述脚本逻辑如下:
1、解析日期:使用 SimpleDateFormat 解析 createTime 字段的日期字符串。
2、获取当前时间:通过 System.currentTimeMillis()获取当前时间的毫秒数。
3、计算日期差异:算出 createTime 与当前时间的天数差异。
4、**设置 time_bucket**:
4.1 若 diffDays <= 3,则 time_bucket = 1(表示 3 天内)。
4.2 若 diffDays <= 7,则 time_bucket = 2(表示 4 – 7 天内)。
4.3 其他情况,time_bucket = 3(表示 7 天前)。
4.4 在这个过程中,我们使用了 UTC 时区,以此确保日期计算的准确性。
在这个过程中,我们使用了 UTC 时区,以此确保日期计算的准确性。
(二)创建索引并设置映射
接下来,我们创建名为 t1 的索引,并设置相应的映射,确保各字段类型正确无误。
PUT t1
{
    "mappings": {
        "properties": {
            "id": {
                "type": "keyword"
            },
            "createTime": {
                "type": "date",
                "format": "yyyy - MM - dd"
            },
            "content": {
                "type": "text"
            },
            "time_bucket": {
                "type": "integer"
            }
        }
    },
    "settings": {
        "number_of_shards": 1,
        "number_of_replicas": 1,
        "default_pipeline": "add_time_bucket"
    }
}
各字段说明如下:
id:作为唯一标识符,使用 keyword 类型。
createTime:文档的创建时间,使用 date 类型,格式为 yyyy – MM – dd。
content:文本内容字段,使用 text 类型,支持全文搜索。
time_bucket:预计算的时间档次字段,使用 integer 类型,专门用于排序。
这里要特别注意,”default_pipeline”: “add_time_bucket”这一设置非常关键,它确保了在索引文档时,会自动应用我们之前定义的 add_time_bucket 管道。
(三)索引示例数据
定义好管道后,我们使用它来索引一些示例文档。以下是六个示例文档,涵盖了不同的时间档次。
POST t1/_bulk
{ "index": { "_id": "1" } }
{ "id": "102", "createTime": "2025 - 01 - 06", "content": "这是一个 3 天内测试内容 1" }
{ "index": { "_id": "2" } }
{ "id": "101", "createTime": "2025 - 01 - 06", "content": "这是一个 3 天内测试内容 2" }
{ "index": { "_id": "3" } }
{ "id": "103", "createTime": "2025 - 01 - 06", "content": "这是一个 3 天内测试内容 3" }
{ "index": { "_id": "4" } }
{ "id": "4", "createTime": "2025 - 01 - 02", "content": "另一个测试内容" }
{ "index": { "_id": "5" } }
{ "id": "5", "createTime": "2025 - 01 - 02", "content": "另一个测试内容 2" }
{ "index": { "_id": "6" } }
{ "id": "5", "createTime": "2024 - 12 - 28", "content": "更早的测试内容" }
这些文档的时间档次划分如下:
1、文档 1 – 3:createTime 为 2025 – 01 – 06(假设当前日期为 2025 – 01 – 09),其 time_bucket 为 1(表示 3 天内)。
2、文档 4 – 5:createTime 为 2025 – 01 – 02,time_bucket 为 2(表示 4 – 7 天内)。
3、文档 6:createTime 为 2024 – 12 – 28,time_bucket 为 3(表示 7 天前)。
(四)执行查询
现在,我们通过以下 DSL 查询语句,实现按时间档次和相关度排序的需求。
GET t1/_search
{
    "query": {
        "match": {
            "content": "测试"
        }
    },
    "sort": [
        {
            "time_bucket": {
                "order": "asc"
            }
        },
        {
            "_score": {
                "order": "desc"
            }
        }
    ]
}
该查询语句说明如下:
查询部分:使用 match 查询在 content 字段中匹配关键词“测试”。
排序部分:
第一层排序,按 time_bucket 升序排序,保证 time_bucket = 1 的文档优先展示。
第二层排序,在每个 time_bucket 内,按 _score(相关度分值)降序排序,使得相关性高的文档优先展示。
(五)预期查询结果
假设当前日期为 2025 – 01 – 09,执行上述查询后,预期的查询结果如下:
{
    "took": 1,
    "timed_out": false,
    "_shards": {
        "total": 1,
        "successful": 1,
        "skipped": 0,
        "failed": 0
    },
    "hits": {
        "total": {
            "value": 6,
            "relation": "eq"
        },
        "max_score": null,
        "hits": [
            {
                "_index": "t1",
                "_id": "1",
                "_score": 0.13489556,
                "_source": {
                    "time_bucket": 1,
                    "id": "102",
                    "createTime": "2025 - 01 - 06",
                    "content": "这是一个 3 天内测试内容 1"
                },
                "sort": [
                    1,
                    0.13489556
                ]
            },
            {
                "_index": "t1",
                "_id": "2",
                "_score": 0.13489556,
                "_source": {
                    "time_bucket": 1,
                    "id": "101",
                    "createTime": "2025 - 01 - 06",
                    "content": "这是一个 3 天内测试内容 2"
                },
                "sort": [
                    1,
                    0.13489556
                ]
            },
  。。。。。。省略一部分。。。。。
            {
                "_index": "t1",
                "_id": "6",
                "_score": 0.16707027,
                "_source": {
                    "time_bucket": 3,
                    "id": "5",
                    "createTime": "2024 - 12 - 28",
                    "content": "更早的测试内容"
                },
                "sort": [
                    3,
                    0.16707027
                ]
            }
        ]
    }}
实际结果如下:
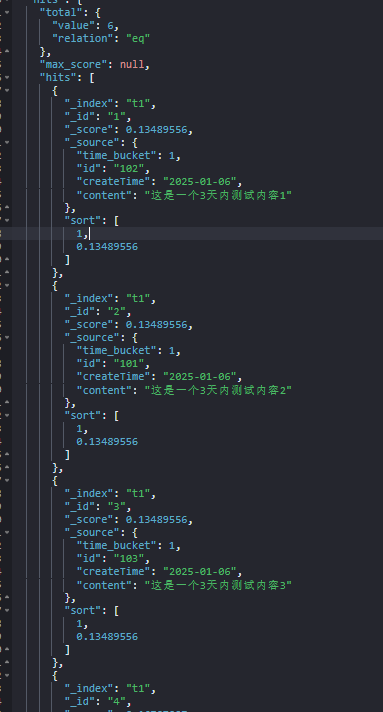
展示顺序如下:
1、**time_bucket = 1**:
文档 1 (id: 102)
文档 2 (id: 101)
文档 3 (id: 103)
2、**time_bucket = 2**:
文档 4 (id: 4)
文档 5 (id: 5)
3、**time_bucket = 3**:
文档 6 (id: 6)
可以看到,每个时间档次内的文档按 _score 从高到低排序,保证了相关性高的文档优先展示。
四、注意事项
1、时间格式一致性:
在索引文档时,务必确保 createTime 的格式与映射中的格式一致,即”yyyy – MM – dd”。
2、时区处理:
在脚本中使用 UTC 时区,防止因时区差异导致日期计算错误。
3、脚本性能优化:
尽量保持 Ingest Pipeline 脚本简洁,减少复杂计算,以降低索引和更新时的性能开销。
4、数据更新机制:
由于 time_bucket 是基于当前日期动态计算的,必须定期更新以反映最新的时间档次。缺乏及时更新可能导致排序结果不准确。
5、错误调试:
如果在脚本执行过程中遇到错误,可以通过简化脚本逐步调试。例如,先尝试仅解析日期并输出 createDate,然后逐步添加其他逻辑。
6、索引设置优化:
根据实际数据量和查询需求,合理设置 number_of_shards 和 number_of_replicas,以优化性能和容错能力。
五、总结
本文详细阐述了如何在 Elasticsearch 中,通过优化索引创建、映射设计以及使用 Ingest Pipeline,实现按特定时间档次和相关度排序的需求。通过预计算 time_bucket 字段,避免了在查询时使用脚本排序带来的性能开销,提升了查询效率和结果的准确性。
关键步骤总结如下:
1、创建合理的映射:
保证字段类型正确,尤其是 createTime 和 time_bucket 字段。
2、使用 Ingest Pipeline:
在索引时计算并添加 time_bucket 字段,保证排序的高效性。
3、优化查询语句:
通过双重排序,实现按时间档次和相关度的精准排序。
4、定期更新 time_bucket:
通过定期运行 Update By Query,保持 time_bucket 的最新状态。
通过这些步骤,我们可以在 Elasticsearch 中高效地实现复杂的排序需求,提升搜索体验和系统性能。

![【学习强国】[挑战答题]带选项完整题库(2020年4月20日更新)-武穆逸仙](https://www.iwmyx.cn/wp-content/uploads/2019/12/timg-300x200.jpg)


![【学习强国】[新闻采编学习(记者证)]带选项完整题库(2019年11月1日更新)-武穆逸仙](https://www.iwmyx.cn/wp-content/uploads/2019/12/77ed36f4b18679ce54d4cebda306117e-300x200.jpg)
