在这个属于人工智的时代,你是否每天都需要手动执行那些乏味耗时的任务。其实我们可以使用 Python 来对它们进行自动化,解放你的双手。本文将向你展示 10 个 Python 脚本,能够让你的日常工作自动化。所以将这篇文章加入你的收藏夹吧!
话不多说,我们直接上干货!
1. 创建 WiFi 二维码
如果你经常忘记你的 Wifi 密码,那你可以利用这个脚本制作一个二维码,以后可以随时轻松扫描并连接,或与你的朋友或任何人分享。这个 Python 脚本使用 Qrcode 模块,它帮助你通过简单的信息(如你的 wifi 名称和密码)创建你的 Wifi 二维码。是不是挺有意思的?立即试试吧?。
# pip install qrcode
import qrcode

def wifi_qr_generator(wifi_name, password, encrption='WPA'):
    wifi_template = f'WIFI:S:{wifi_name};T:{encrption};P:{password};;'
    qr = qrcode.QRCode(
        version=1,
        box_size=10,
        border=4,
    )
    qr.add_data(wifi_template)
    qr.make(fit=True)
    qr_img = qr.make_image(fill='black', back_color='white')
    qr_img.save('wifi_qr.png')

if __name__ == '__main__':
    wifi_qr_generator('jackzhang', 'jackzhang110')
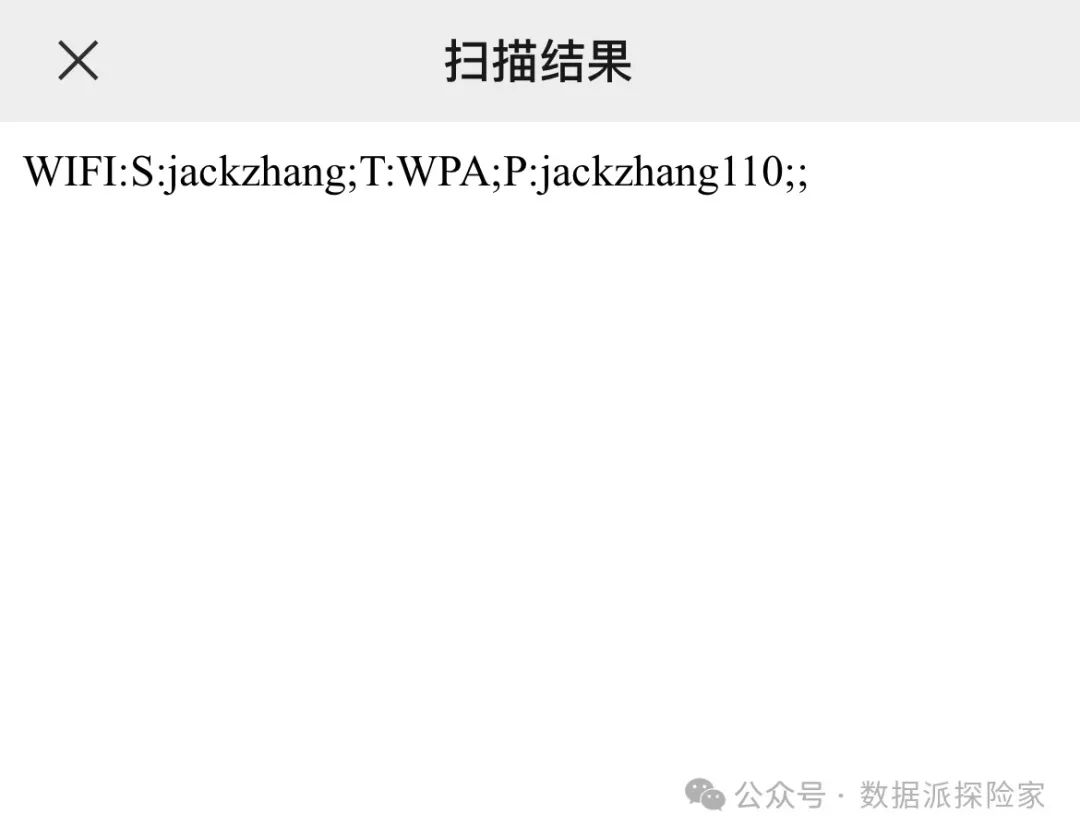
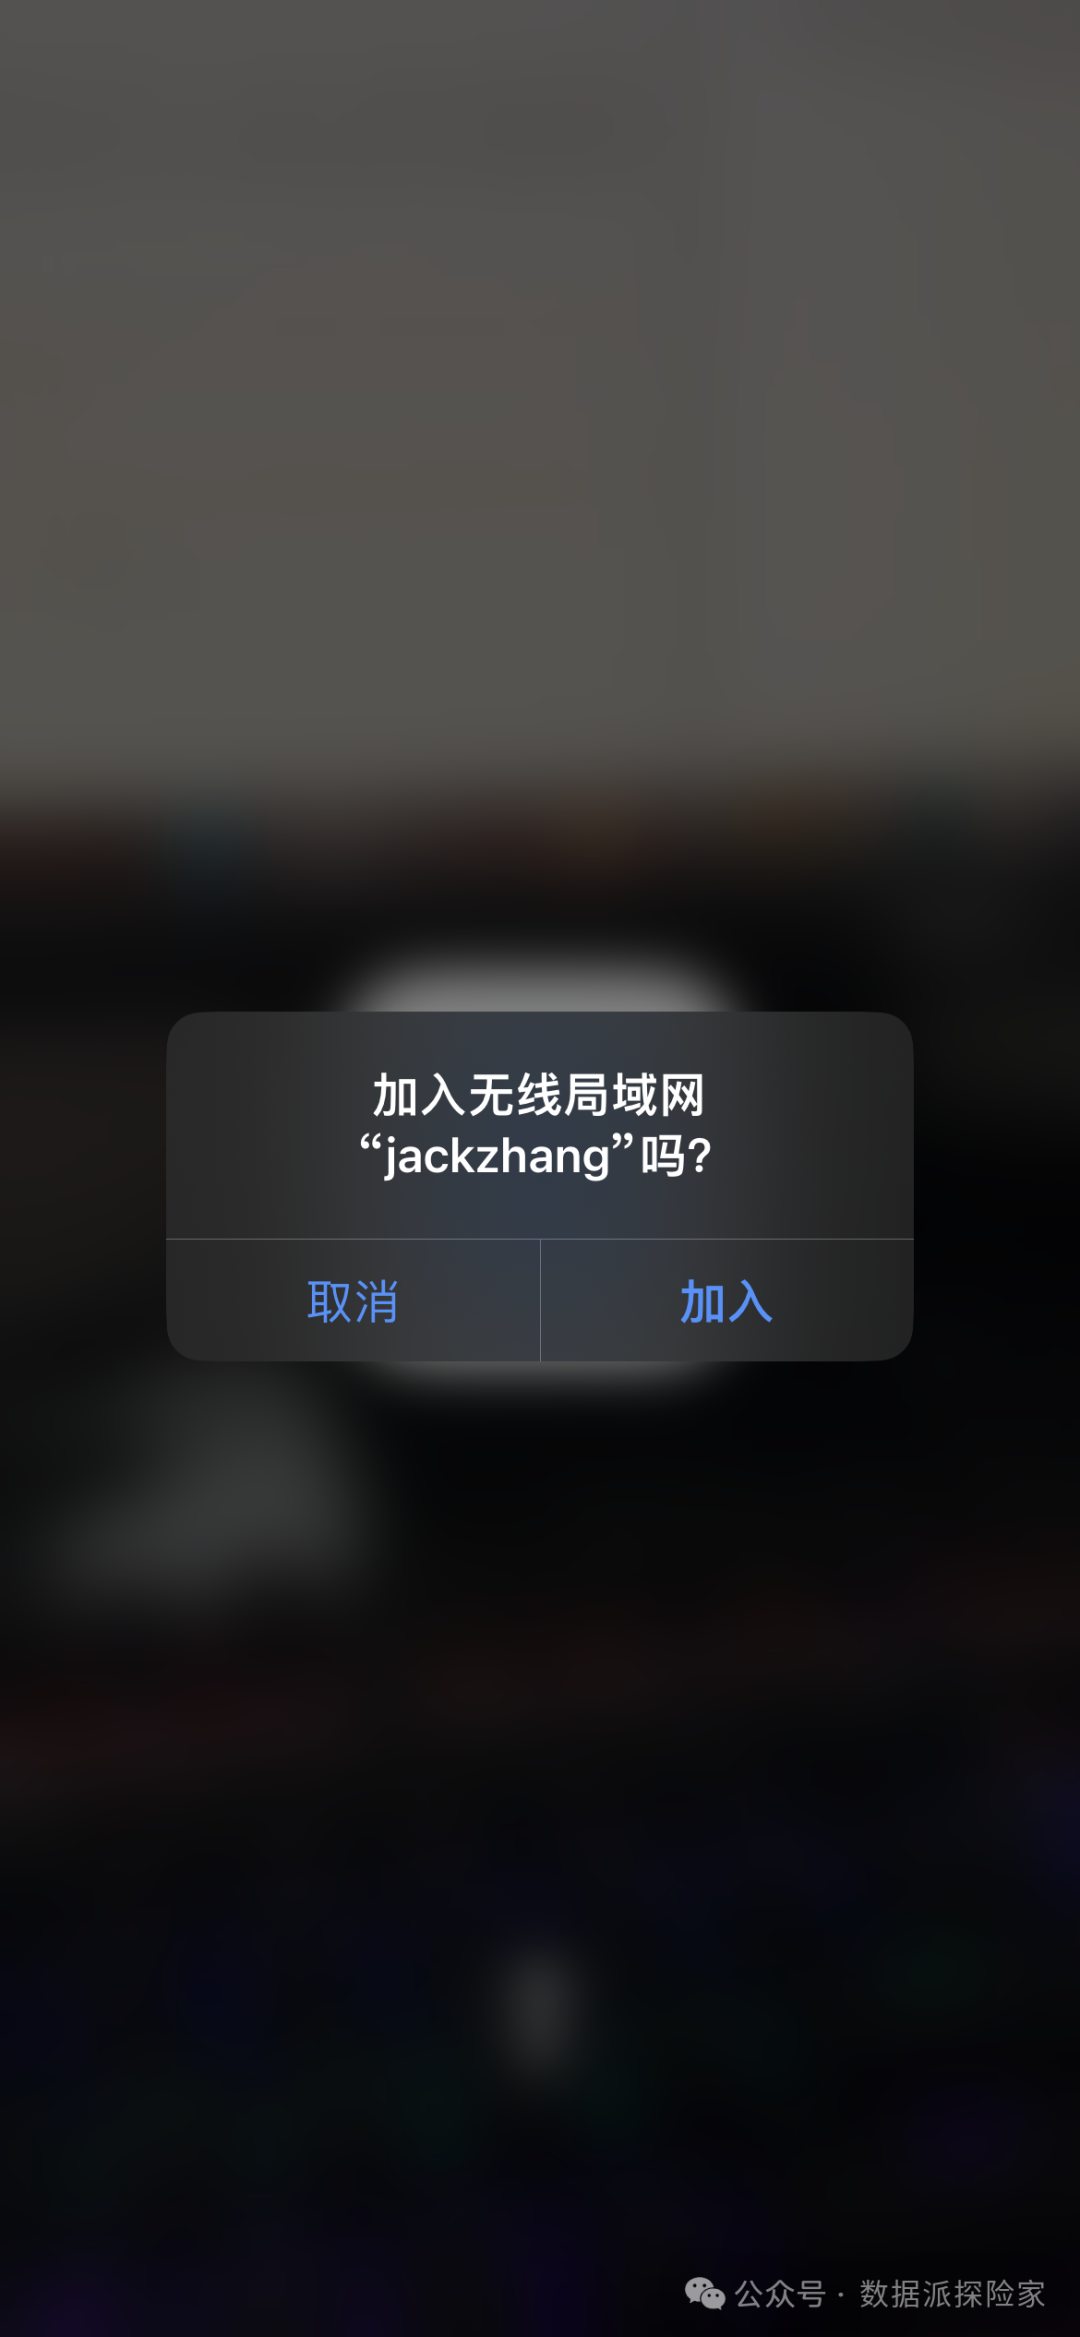
运行上面的脚本,将会在当前目录下生成一个二维码,用微信扫描将会得到 WiFi 名称和密码,如果用手机自带的二维码扫描功能的话会直接跳出弹窗询问你是否连接到该无线网。

2. 图片背景移除
不需要 Photoshop 或任何付费的网络应用程序来删除照片的背景。现在你可以用 Python 轻松完成。下面的脚本使用 Rembg 模块,将向你展示如何去除任意图像的背景。
当我有很多图片需要去除背景时,我就喜欢这个脚本,建议你一定要试试看。?
 pip install rembg
import rembg as rm

def image_bg_remover(file_name):
    output_path = 'bg_remove.png'
    with open(file_name, 'rb') as input_file:
        input_image = input_file.read()

    output_data = rm.remove(input_image)

    with open(output_path, 'wb') as output_file:
        output_file.write(output_data)

    print('Background removed successfully!')

if __name__ == '__main__':
    file_name = r"your_image_path"
    image_bg_remover(file_name)
注意,首次运行该脚本,需要下载下面的工具(自动下载),之后再运行就不需要下载了:


感觉效果还不错。
3. PDF 转换 CSV
如果你想将你的 PDF 表转换为 CSV,可以考虑使用这个简单的 Python 脚本,它使用 Camelot 获取 PDF 文件中的简单和复杂表格,并使用 Pandas 模块将获取到的表格保存在 CSV 文件中。立即试试看吧 ?。
# pip install camelot-py
# pip install ghostscript
import camelot
import pandas as pd

if __name__ == '__main__':
    file_name = 'test.pdf'
    tables = camelot.read_pdf(file_name, pages='all')

    # Convert pdf to csv
    for i in range(len(tables)):
        tables[i].to_csv('table' + str(i) + '.csv')

    # Merge all csvs
    df = pd.concat([pd.read_csv('table' + str(i) + '.csv') for i in range(len(tables))])
    df.to_csv('output.csv', index=False)

    print('PDF to CSV done!')
注意,要运行该脚本,除了在 Python 环境安装 ghostscript 库外,还需要安装 Ghostscript 软件(https://ghostscript.com/releases/gsdnld.html),笔者是 Windows 环境:
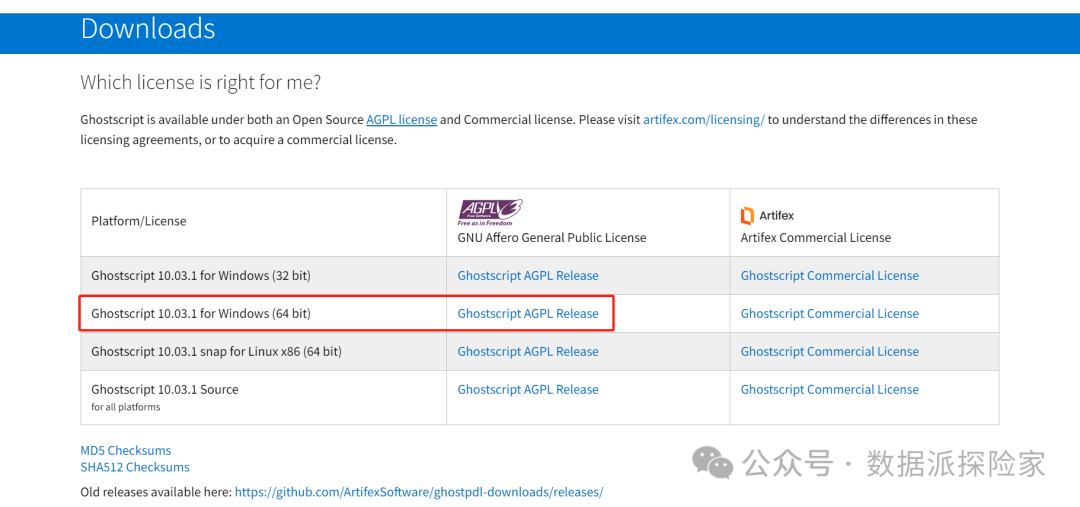
安装完成后,将其 bin 文件夹添加到系统环境变量 path 中,然后重启 IDE 再次运行程序才会成功。
4. 给文件上锁
工作中,难免会遇到别人有意或无意查看自己的重要文件,这个时候你会在想要是能给文件上把锁就好了。这样别人在没获得你授权的前提下就不能查看你的文件。这个目的可以通过 Python 完成。下面的脚本使用 PyAesCrypt 模块,向你展示如何使用密码锁定和解锁文件。拿走即用,赶快试试吧。
# pip install pyAesCrypt
import pyAesCrypt as pac
import os

def locking(file_name, passwd):
    pac.encryptFile(file_name, file_name + '.lock', passwd)
    os.remove(file_name)
    print(f'Locking file {file_name} done!')


def unlocking(file_name, passwd):
    original = file_name.replace('.lock', '')
    pac.decryptFile(file_name, original, passwd)
    os.remove(file_name)
    print(f'Unlocking file {file_name} done!')

if __name__ == '__main__':
    locking('myfile.txt', 'passwd110')
    # unlocking('myfile.txt.lock', 'passwd110')
假设 “myfile.txt” 文件包含文本内容:Locking and unlocking file demo!
执行 locking 方法后,你将会看到该文件图标变成了一把锁的样子,且如果打开文件后会看到内容全是乱码:


注释 locking 方法,执行 unlocking 方法后就可以得到原始文件。
5. 批量扫描二维码
想象一下,如果你有很多二维码,你会一个个扫描它们吗?肯定不会,因为那会显得很愚蠢,且事倍功半,为什么不借助自动化实现呢。你可以使用下面的脚本完成,该脚本使用 Pyzbar 模块,可以帮助你扫描二维码图像并显示它们的数据。?
# pip install pyzbar pillow opencv-python
from pyzbar.pyzbar import decode
from PIL import Image
import cv2

def scan_qr(qr_img):
    # Load QR image
    img = cv2.imread(qr_img)
    # Decode the QRCode
    data = decode(Image.fromarray(img))
    # Save the data
    qr_data = data[0].data.decode('utf-8')

    print(f'QR Code Data: {qr_data}')

if __name__ == '__main__':
    scan_qr('wifi_qr.png')
就拿我们前面生成的 WiFi 二维码图片做测试文件,执行该脚本后会输出 WiFi 的账号密码信息。如果你有很多二维码图片,只需要在外面套一层循环即可轻松实现批量扫描。
6. 迷你视频编辑器
正在寻找在线视频编辑软件?赶紧停下来吧!现在你可以使用 Python 制作迷你视频编辑器。这个脚本使用了 Moviepy 模块,该模块以其视频处理任务而闻名。你可以裁剪、调整大小、合并、添加视觉效果、添加音频和编辑视频设置,如速度、音量等等。尽情展现你的创意,探索这个模块吧 ?
# pip install moviepy
from moviepy.editor import *
from moviepy.video.fx import all
from moviepy.config import change_settings


change_settings({"IMAGEMAGICK_BINARY": r"C:\Program Files\ImageMagick-7.1.1-Q16-HDRI\magick.exe"})


class VideoEditor:
    def __init__(self, video_file):
        self.video_file = video_file

    # Load video file
    def load_video(self):
        video = VideoFileClip(self.video_file)
        return video

    # Print video information
    def get_video_info(self, video):
        print(f'Video size: {video.size}')
        print(f'Video duration: {video.duration}')
        print(f'Video fps: {video.fps}')
        print(f'Video audio: {video.audio}')

    # Trim video
    def trim_video(self, video):
        video = video.subclip(0, 10)
        return video

    # Resize video
    def resize_video(self, video):
        video = video.Resize((640, 480))
        return video

    # Flip video
    def flip_video(self, video):
        video = video.fx(vfx.mirror_x)
        return video

    # Rotate video
    def rotate_video(self, video):
        video = video.fx(vfx.rotate, 90)
        return video

    # Merge videos
    def merge_videos(self, video1_file, video2_file):
        video1 = VideoFileClip(video1_file)
        video2 = VideoFileClip(video2_file)
        merged_video = concatenate_videoclips([video1, video2])
        merged_video.write_videofile('merge_video.mp4')

    # Add audio to video
    def add_audio_to_video(self, audio_file, video):
        video = video.set_audio(audio_file)
        return video

    # Add text to video
    def add_text_to_video(self, text, video):
        # The parameter 'font' is to support Chinese character
        txt = TextClip(text, fontsize=40, color='white', font='华文仿宋')
        txt = txt.set_pos('center').set_duration(10)
        txt = txt.set_duration(video.duration)
        txt = txt.set_position('center')
        final = CompositeVideoClip([video, txt])
        return final

    # Add image to video
    def add_image_to_video(self, image, video):
        img = ImageClip(image)
        img = img.set_duration(10)
        img = img.set_position(('center', 'center'))
        final = CompositeVideoClip([video, img])
        return final

    # Add transition to video
    def add_trans_to_video(self, video1_file, video2_file):
        video1 = VideoFileClip(video1_file)
        video2 = VideoFileClip(video2_file)
        transition = vfx.crossfade(video1, video2, 1)
        return transition

    # Add effect to video
    def add_effect_to_video(self, video):
        video = video.fx(vfx.colorx, 0.5)
        return video

    # Set the speed of video
    def set_speed_of_video(self, video):
        video = video.fx(vfx.speedx, 2)
        return video

    # Convert images to video
    def convert_image_to_video(self, img1, img2):
        img1 = ImageClip(img1)
        img2 = ImageClip(img2)
        img1 = img1.set_duration(5)
        img2 = img2.set_duration(5)
        video = concatenate_videoclips([img1, img2])
        return video

    # Save video
    def save_video(self, video, video_name):
        video.write_videofile(f'{video_name}.mp4')
        print(f'Video saved at {video_name}.mp4')


if __name__ == '__main__':
    video_file = r"线性代数教程 1——向量简介.mp4"
    image_path = r"向量简介-封面.jpg"
    ve = VideoEditor(video_file)
    video = ve.load_video()
    ve.get_video_info(video)

    # 添加封面
    video_img = ve.add_image_to_video(image_path, video)
    # 添加标题信息
    video_text = ve.add_text_to_video(text='线性代数教程 1:向量基础简介', video=video_img)
    ve.save_video(video_text, '线性代数教程 1——向量简介')
注意运行该脚本前需要安装 ImageMagick,并且将安装路径添加到系统环境变量中,否则会报错。添加了环境变量后如果仍然报错,可以像笔者这样在脚本中指定路径:change_settings({“IMAGEMAGICK_BINARY”: r”C:Program FilesImageMagick-7.1.1-Q16-HDRImagick.exe”})。在上面的测试中,我们向视频添加了一个封面,然后增加了一个标题信息,都可以正常实现。你还可以按自己的想法添加别的东西,不过注意,调用方法越多程序运行时间越长。
7. 饮水通知器
使用这个饮水通知器脚本可以让自己每天保持水分充足。大多数人会忘记喝水来保持全天身体和大脑的水分,但这个脚本使用 Pyler 模块,会在你需要喝水保持日常水分平衡时提醒你。
它会每小时在任务栏中发出通知,甚至告诉你一天中喝了多少杯水。
# pip install plyer
from plyer import notification
import time

def water_notifier(glass_count, total_liters):
    notification.notify(
        title='Hydration Reminder',
        message=f'Time to drink water!'
                f'\nYou had {glass_count} glasses today.'
                f'\nTotal: {total_liters:.2f} liters.',
        timeout=10
    )

if __name__ == '__main__':
    glass_count = 0
    total_liters = 0.0
    glass_size = 0.25   # 250 ML

    while True:
        glass_count += 1
        total_liters += glass_size
        water_notifier(glass_count, total_liters)
        time.sleep(60 * 60) # 1 hour
8. 获取免费代理
无需再为 Python 项目或其他内容到处寻找免费代理啦。这个自动化脚本可以让你用几行代码就可以获取免费高质量代理。该脚本使用了 Freeproxy 模块,还可以让你从不同国家选择代理,甚至在 Http 和 Https 代理之间进行选择。
当你需要用于网络爬虫或网络自动化的代理时非常方便,赶快试试吧!?
# pip install free-proxy
from fp.fp import FreeProxy

if __name__ == '__main__':
    # Get free proxies randomly
    proxy_random = FreeProxy().get()
    print(f'Random proxy: {proxy_random}')

    # Get free proxies by country
    proxy_country = FreeProxy(country_id=['US', 'GB']).get()
    print(f'Proxy by Country: {proxy_country}')

    # Get https proxies
    proxy_https = FreeProxy(https=True).get()
    print(f'Https proxy: {proxy_https}')

    # Get elite premium proxies
    proxy_elite = FreeProxy(elite=True).get()
    print(f'Elite proxy: {proxy_elite}')

    # Get proxy after checking
    proxy_check = FreeProxy(timeout=1).get()
    print(f'Check proxy: {proxy_check}')

    # Get Google proxies
    proxy_google = FreeProxy(google=True).get()
    print(f'Google proxy: {proxy_google}')
9. 制作炫酷的二维码
使用下面的脚本,通过 Segno 模块将文本和数据转换为二维码图像,创建自己酷炫时尚的二维码。该脚本还允许你制作 GIF、颜色、图像或为你的图像生成任何二维码。赶快动手制作起来吧!?
# pip install segno qrcode-artistic
import segno as qrcode

if __name__ == '__main__':
    # Make simple QR code
    qr = qrcode.make('Hello Python!')
    qr.save('Simple_qr.png')

    # Make colorful QR code
    qr = qrcode.make('Hello Python!')
    img = qr.to_pil(dark='darkred', data_light='red',
                    data_dark='blue', scale=10)
    img.save('Colorful_qr.png')

    # Make gif style QR code
    qr = qrcode.make('Hello Python!')
    gif = r"your_gif_path"
    qr.to_artistic(background=gif, target=gif, scale=10)
10. 语法修正工具
如果你不想使用谷歌著名的语法修正工具 Grammarly(扩展程序),那么可以在 Python 中创建自己的工具。这个脚本使用 LmProof 模块,帮助你构建一个完整的校对工具,可以纠正你文本中的语法和拼写错误。赶快试试看吧!?。
# pip install lmproof
import lmproof

def grammar_fixer(text):
    proof_reader = lmproof.load('en')
    print(f'Original text: {text}')
    correct_text = proof_reader.proofread(text)
    print(f'Correct text: {correct_text}')


if __name__ == '__main__':
    grammar_fixer('The foxes living on the shire')

![【学习强国】[挑战答题]带选项完整题库(2020年4月20日更新)-武穆逸仙](https://www.iwmyx.cn/wp-content/uploads/2019/12/timg-300x200.jpg)

![【学习强国】[新闻采编学习(记者证)]带选项完整题库(2019年11月1日更新)-武穆逸仙](https://www.iwmyx.cn/wp-content/uploads/2019/12/77ed36f4b18679ce54d4cebda306117e-300x200.jpg)


