一.平台监控架构
基于:Docker + JMeter + InfluxDB + Grafana +Prometheus+ node_exporter 搭建
二.准备 4 台服务器
服务器 A:部署 MySQL 服务
服务器 B:部署应用服务
服务器 C:部署监控服务
服务器 D:部署压力机
三.开始环境搭建
1.服务器 C 安装 Docker
1.1 把 yum 包更新到最新
sudo yum update
更新完成如下图
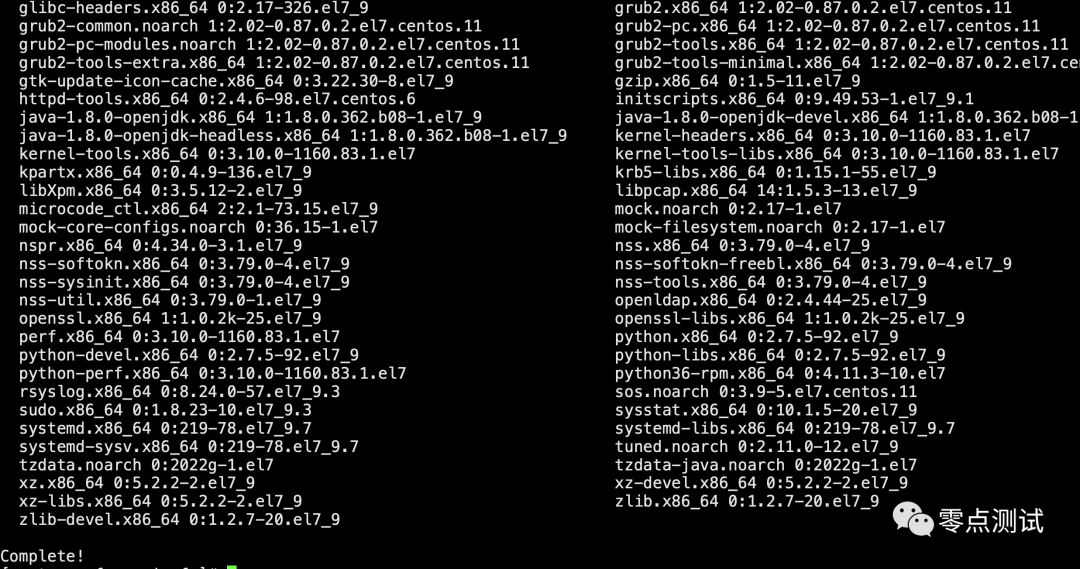
1.2 安装需要的软件包, yum-util 提供 yum-config-manager 功能,device-mapper-persistent-data 和 lvm2 是 devicemapper 驱动依赖的软件包
sudo yum install -y yum-utils device-mapper-persistent-data lvm2
1.3 设置 yum 源为阿里云,配置 yum 源的代理
sudo yum-config-manager –add-repo http://mirrors.aliyun.com/docker-
ce/linux/centos/docker-ce.repo
1.4 安装 docker
sudo yum install docker-ce
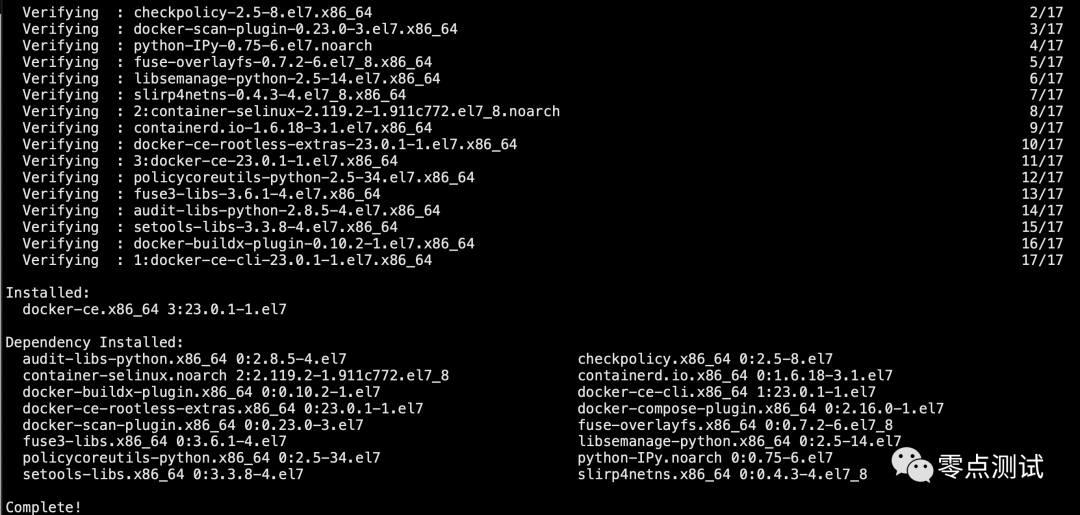
1.5 启动 Docker
systemctl start docker
1.6 查看 docker 版本
docker -v
2.服务器 C 安装 InfluxDB
2.1 下载 InfluxDB 的镜像(这里选用 1.8 版本)
docker pull influxdb:1.8

2.2 启动 InfluxDB 的容器,并将端口 8083 和 8086 映射出来
docker run -d –name influxdb -p 8086:8086 -p 8083:8083 influxdb:1.8

2.3 进入 influxdb 容器内部
docker exec -it influxdb /bin/bash

2.4 创建名为 jmeter 的数据库
输入:influx 命令进入 influx 操作界面
输入:show databases 命令,查看已有的数据库
输入:create database jmeter 命令,创建名为 jmeter 的数据库
输入:show databases 命令,查看数据库创建成功
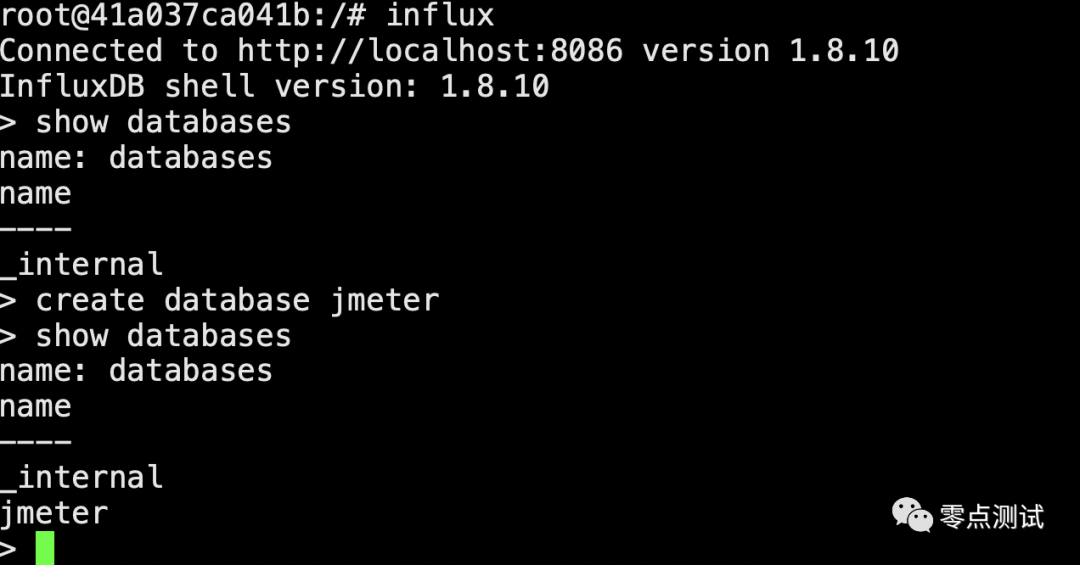
2.5 使用 JMeter 库, 通过 select 查看 JMeter 库中的数据,这个时候是没有数据的
输入:use jmeter 命令,应用刚才创建的数据库
输入:select * from jmeter 命令,查询库中有哪些数据

3 设置 JMeter 脚本后置监听器
3.1 添加后端监听器
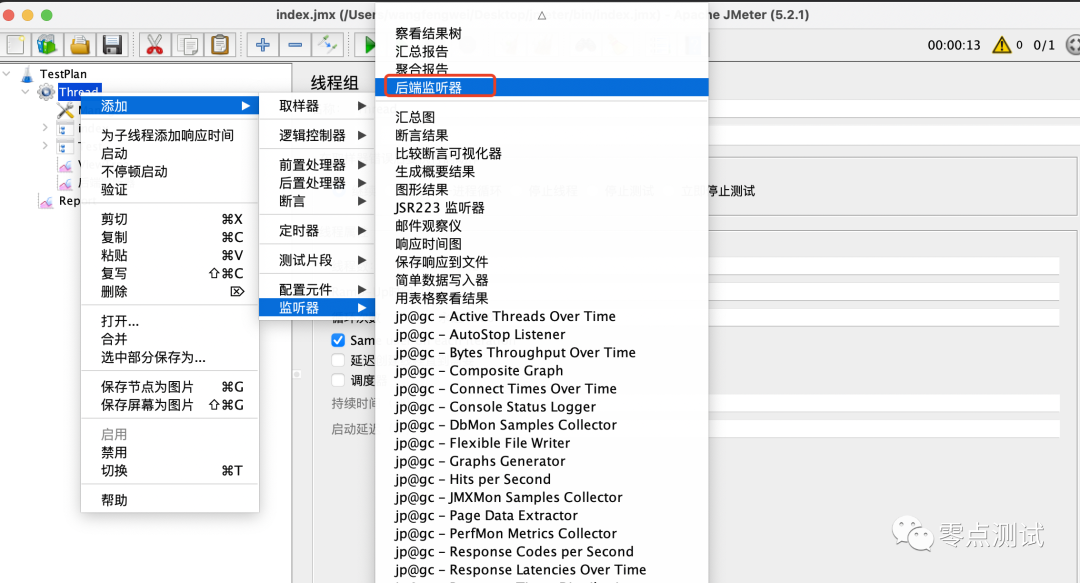
3.2 配置后端监听器
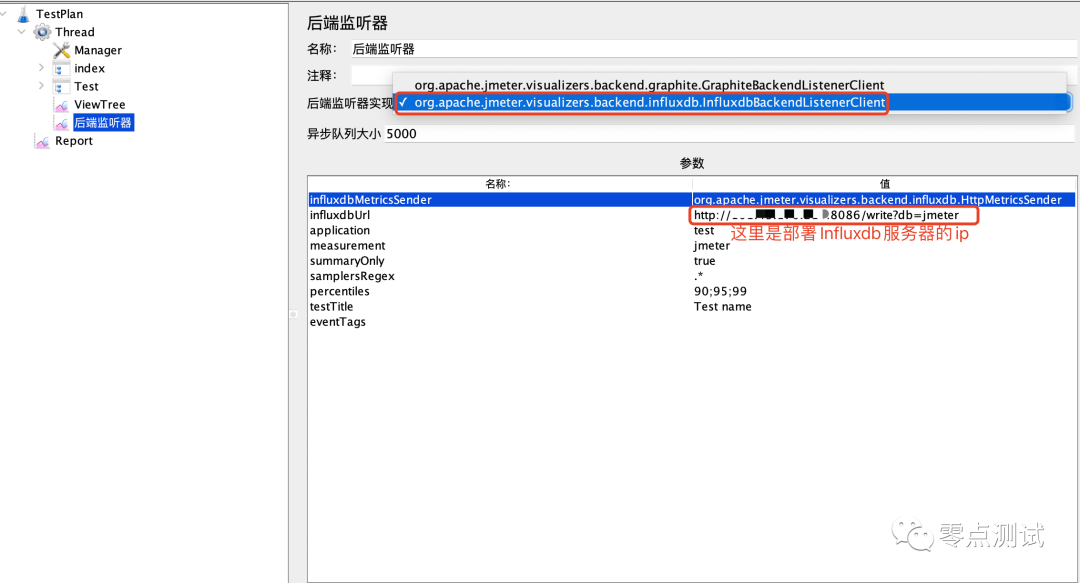
3.3 主要配置参数说明
后端监听器实现:选择 InfluxDB 所对应的
influxdbUrl:需要改为自己 influxdb 的部署 ip 和映射端口,db 后面跟的是上面创建的数据库名称
application:可根据需要自由定义
measurement:表名,默认是 jmeter ,也可以自定义
summaryOnly:选择 true 的话就只有总体的数据。false 会记录总体数据,然后再将每个 transaction 都分别记录
samplersRegex:样本正则表达式,将匹配的样本发送到数据库
percentiles:响应时间的百分位 90、95、99
testTitle:events 表中的 text 字段的内容
eventTags:任务标签,配合 Grafana 一起使用
3.4 运行 Jmeter 脚本,然后再次在 influxdb 中查看数据

4.服务器 C 安装 Grafana
4.1 下载 Grafana 镜像
docker pull grafana/grafana
4.2 启动 Grafana 容器,将 3000 端口映射出来
docker run -d –name grafana -p 3000:3000 grafana/grafana
4.3 浏览器访问 http://服务器 C 的 IP:3000 验证部署是否成功
默认账户密码:admin\admin
5.集成 Grafana+InfluxDB+JMeter
5.1 登录 Grafana 并添加数据源
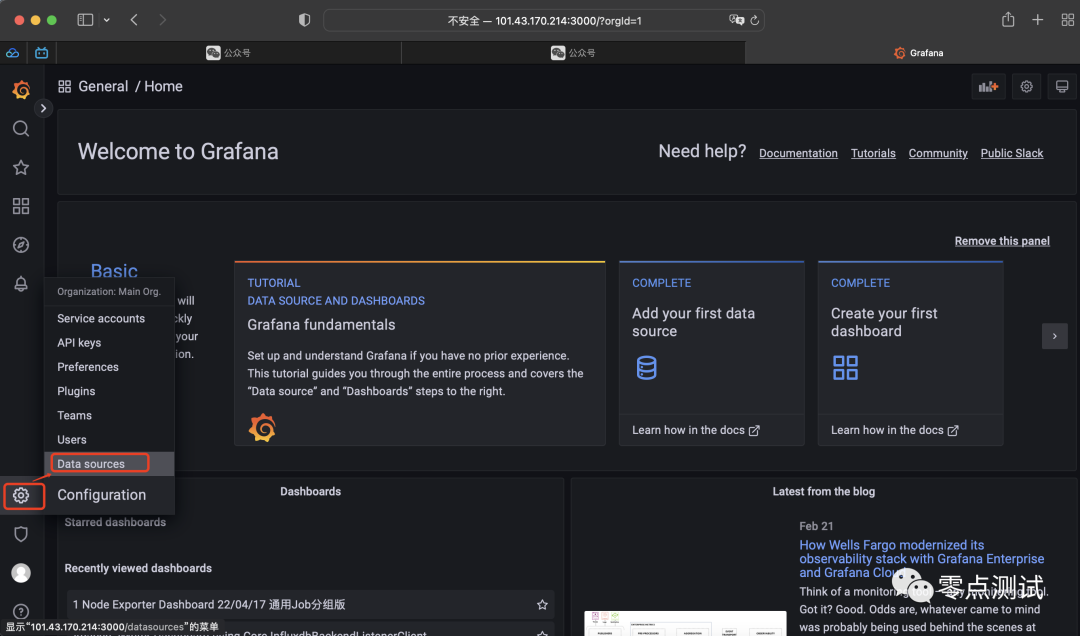
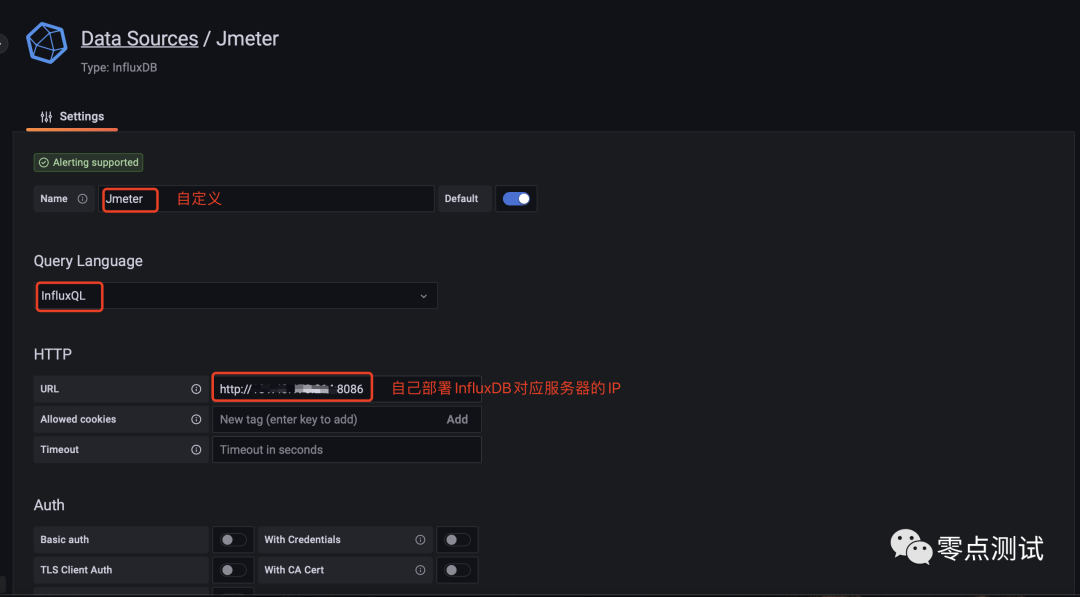
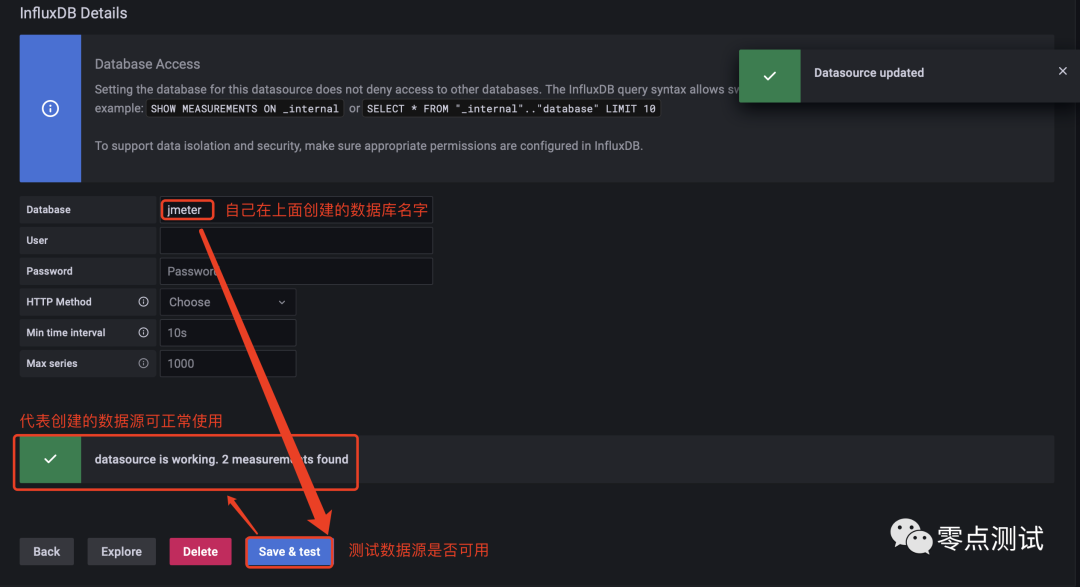
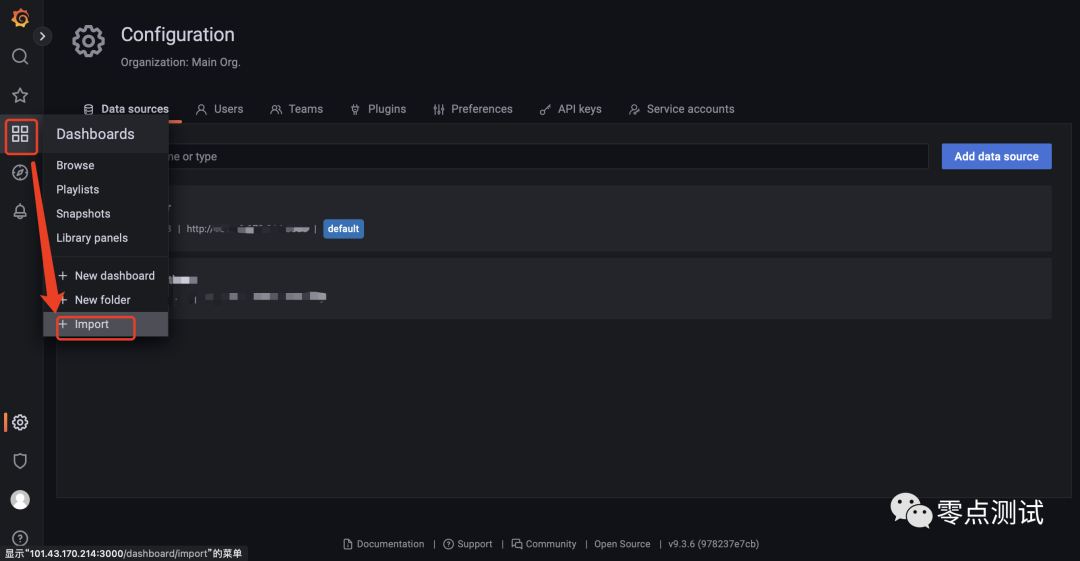
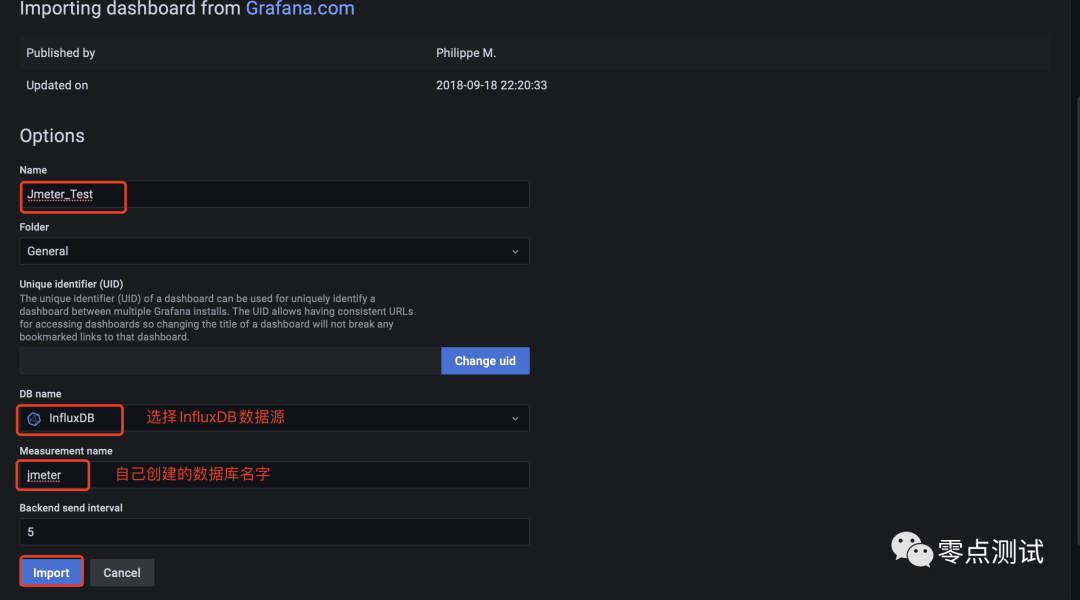
5.2 导入模版(这里使用 5496 模版)

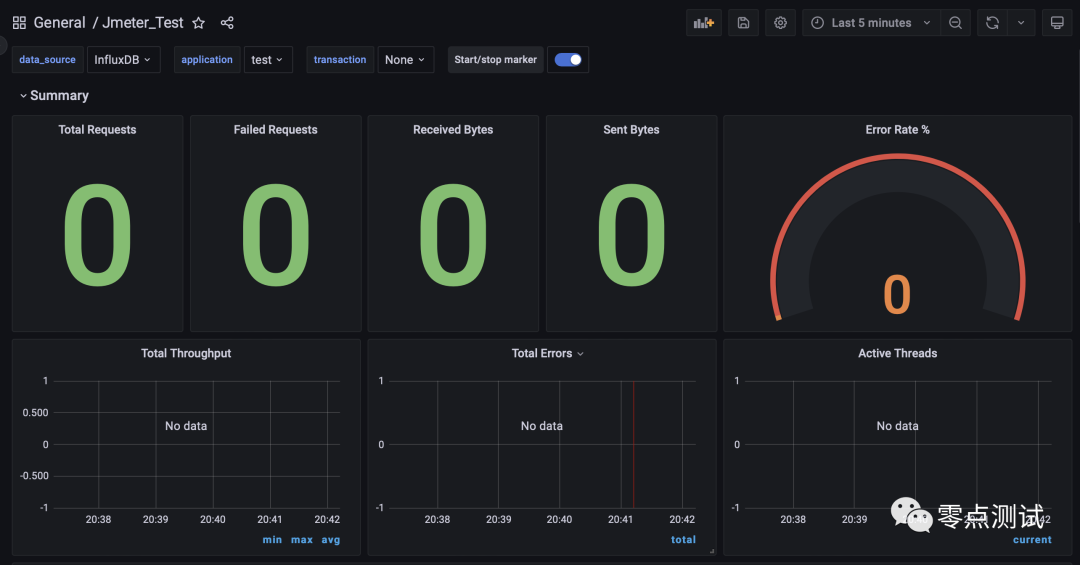
5.3 导入后的可视化页面
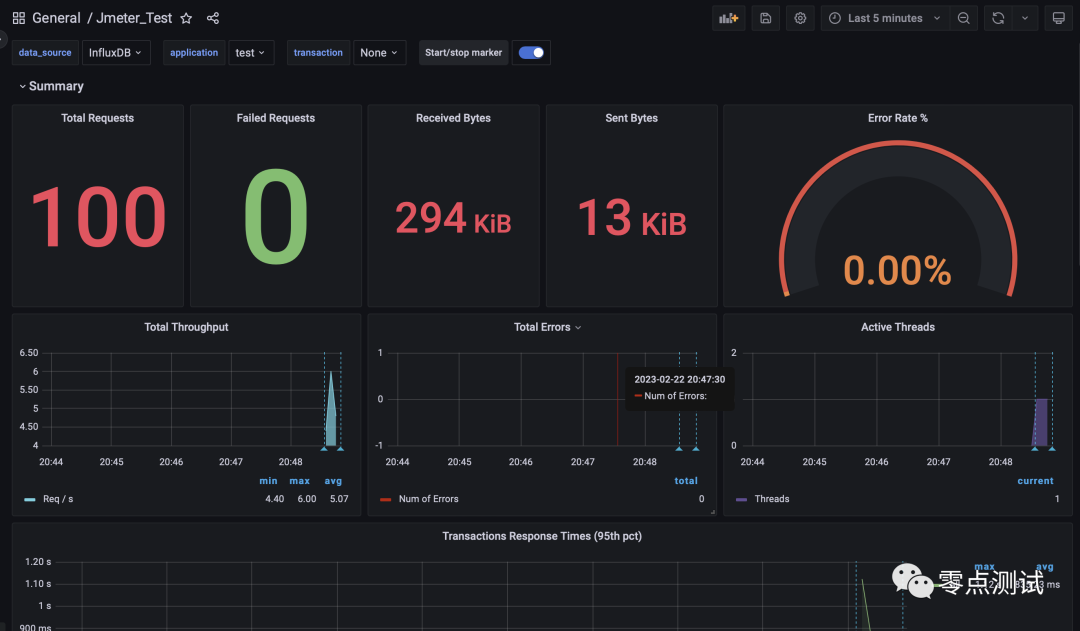
5.4 执行 JMeter 脚本并查看可视化页面
6.应用服务器 B 安装 node_exporter
6.1 安装 node_exporter
下载 wget -c https://github.com/prometheus/node_exporter/releases/download/v0.18.1/node_ex porter-0.18.1.linux-amd64.tar.gz
解压 tar zxvf node_exporter-0.18.1.linux-amd64.tar.gz
启动 cd /usr/local/wfw/node_exporter-0.18.1.linux-amd64
nohup ./node_exporter &
6.2 验证(node_exporter 默认端口是 9100)
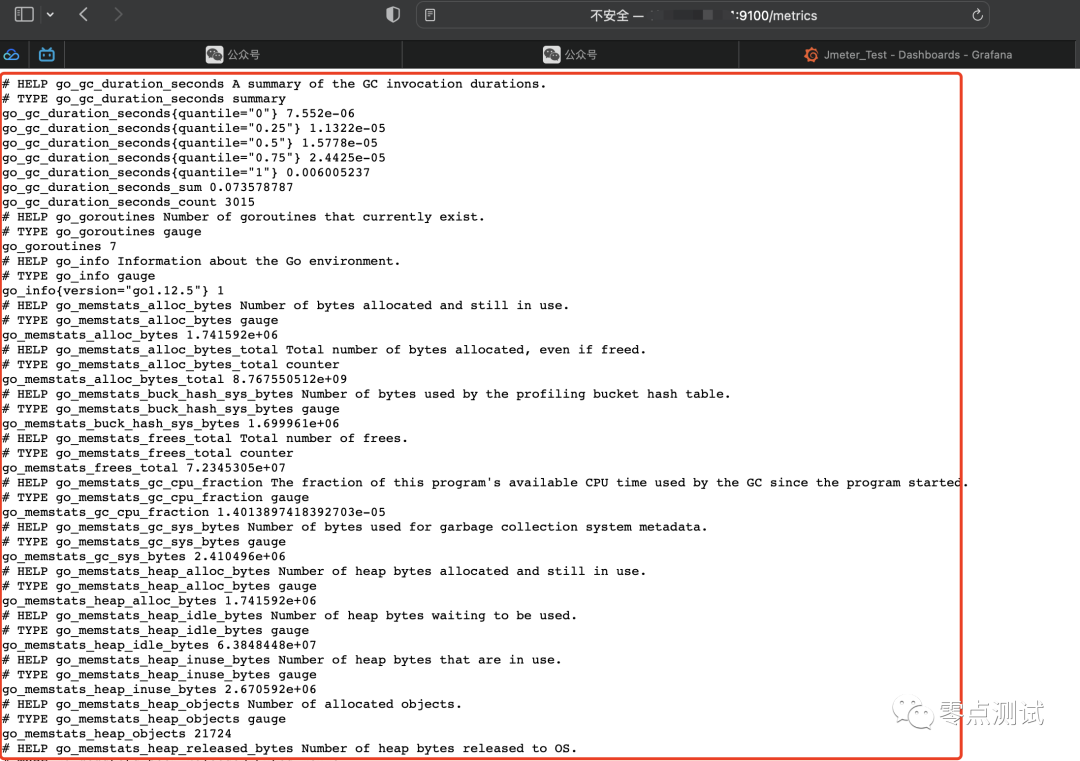
注意:其他需要监控的服务器安装步骤同上,这里不再赘述
7.数据库服务器 A 安装 mysqld_exporter
7.1 下载 mysqld-exporter 镜像
docker pull prom/mysqld-exporter

7.2 启动 mysqld-exporter 并将 9104 接口映射出来
docker run -d -p 9104:9104 –name mysqld-exporter -e DATA_SOURCE_NAME=”数据库服务器用户名:数据库登录密码@(数据库服务器 IP:数据库服务器端口)/” prom/mysqld-exporter

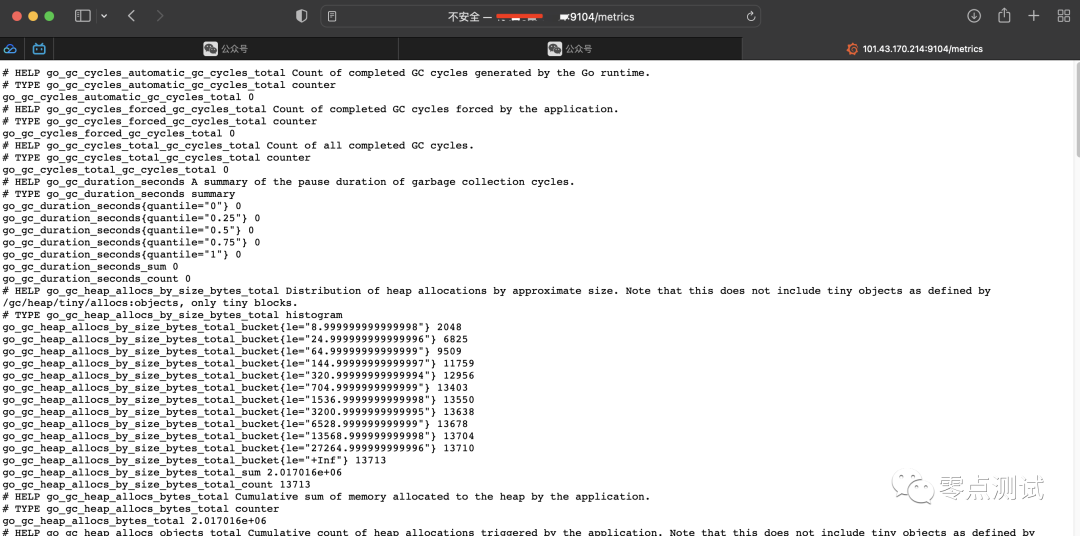
7.3 浏览器访问验证结果
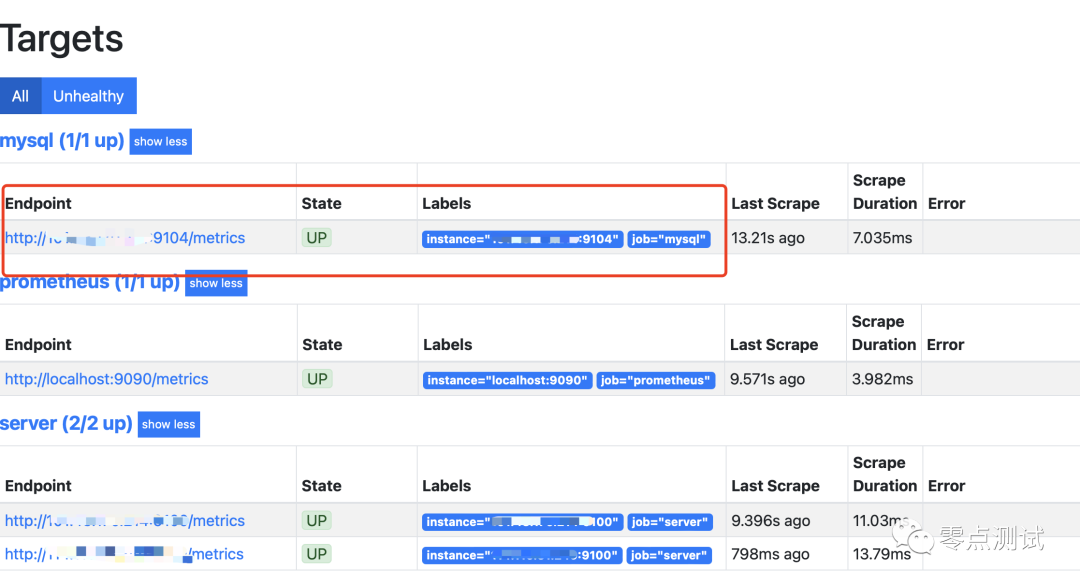
7.4 prometheus 验证结果
8.服务器 C 安装 Prometheus
8.1 安装并运行
下载 wget -c https://github.com/prometheus/prometheus/releases/download/v2.15.1/prometheus -2.15.1.linux-amd64.tar.gz
解压 tar zxvf prometheus-2.15.1.linux-amd64.tar.gz -C /usr/local/hero/
运行 nohup ./prometheus &
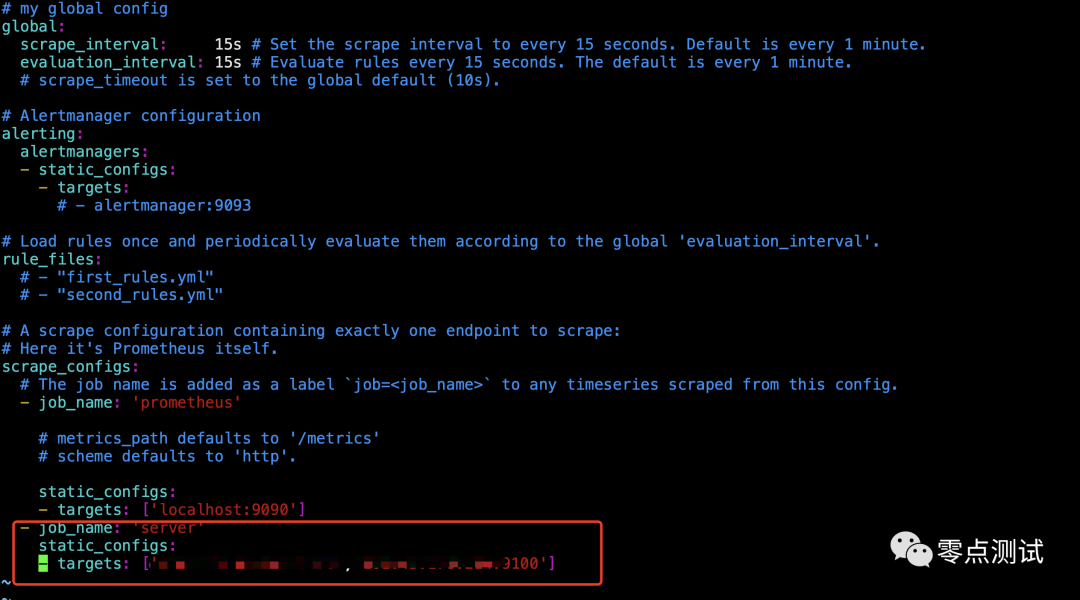
8.2 配置 prometheus.yml
cd prometheus-2.18.1.linux-amd64/
vim prometheus.yml
– job_name: ‘自定义名字’
static_configs:
– targets: [‘Server1_IP:9100′,’Server2_IP:9100′,’xxx_IP:9100’]
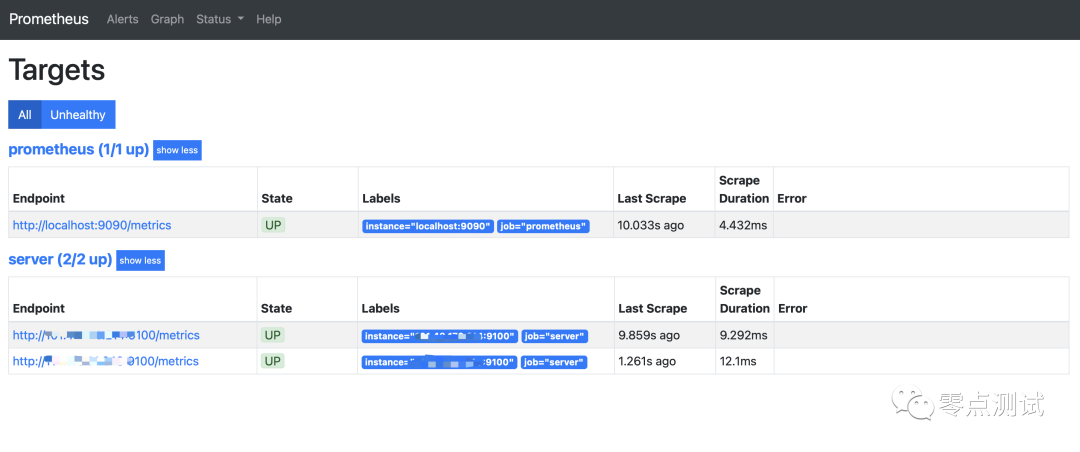
8.3 测试 Prometheus 是否安装配置成功(http://部署 Prometheus 服务的 IP:9090/targets),默认端口是 9090
8.4 在 Grafana 中配置 Prometheus 的数据源
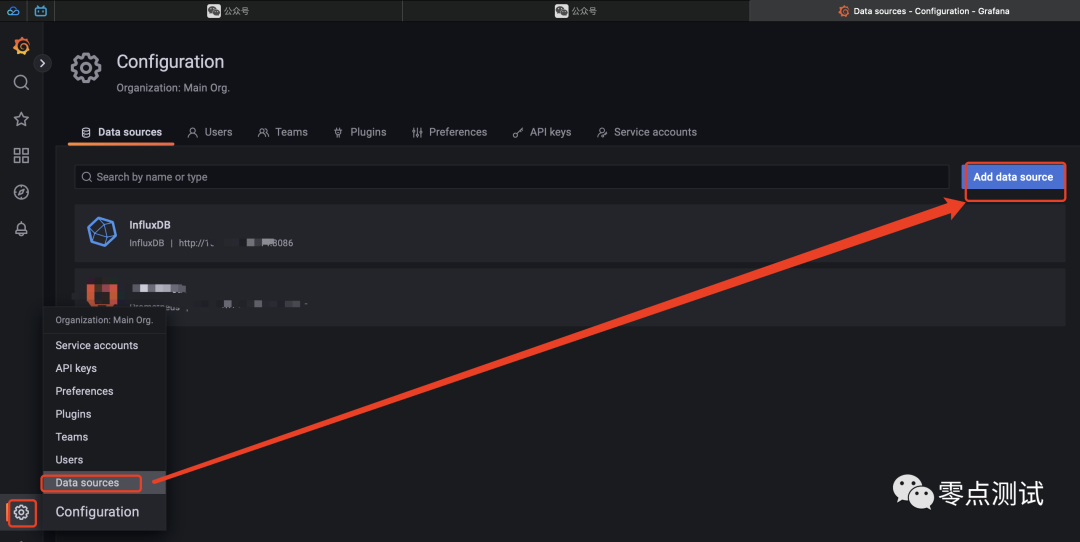
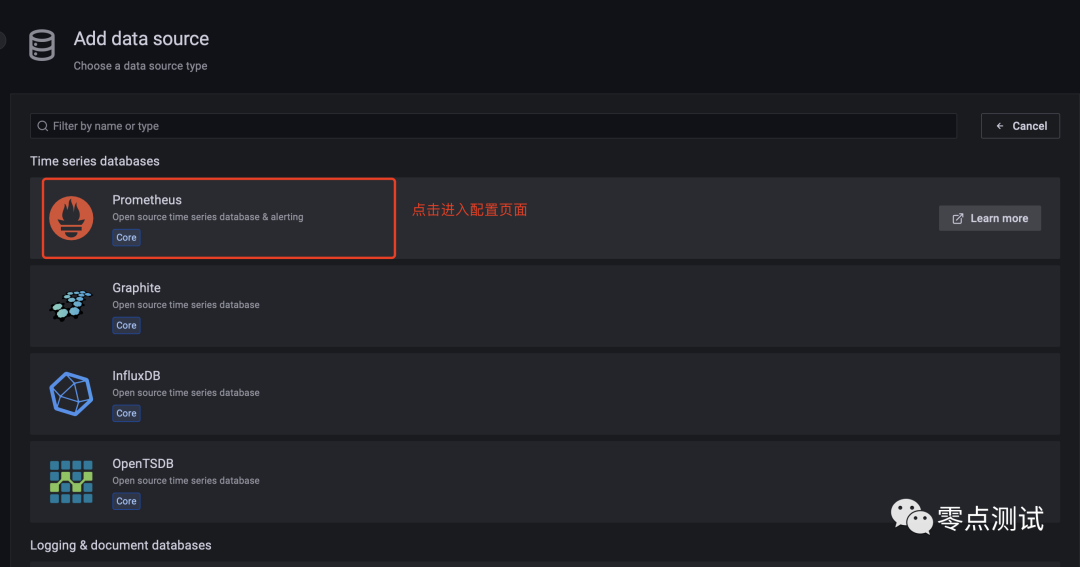
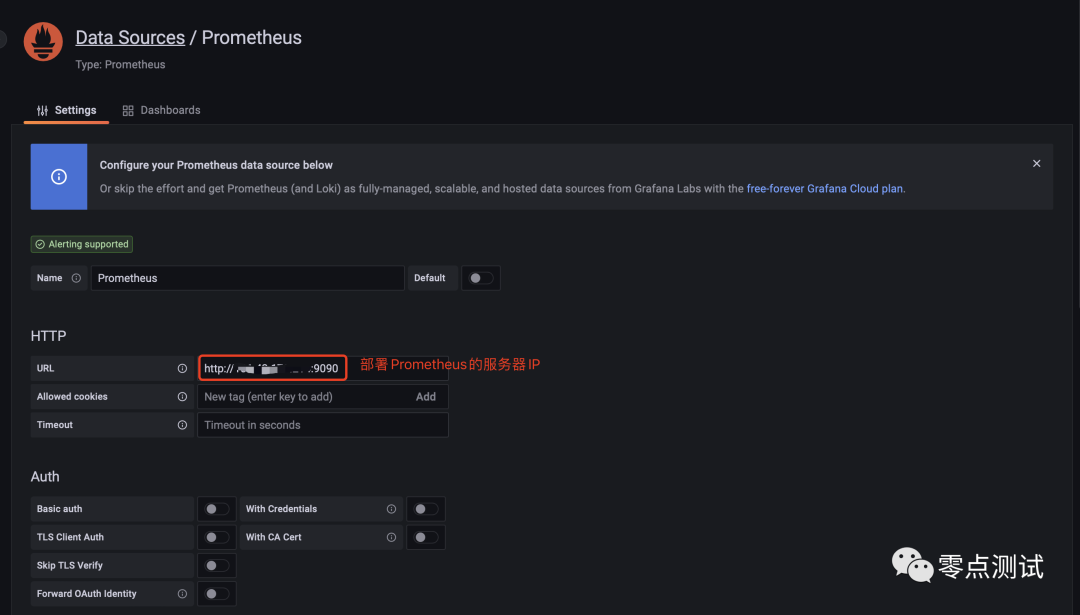
8.5 导入 Linux 监控模版(这里使用 16098)
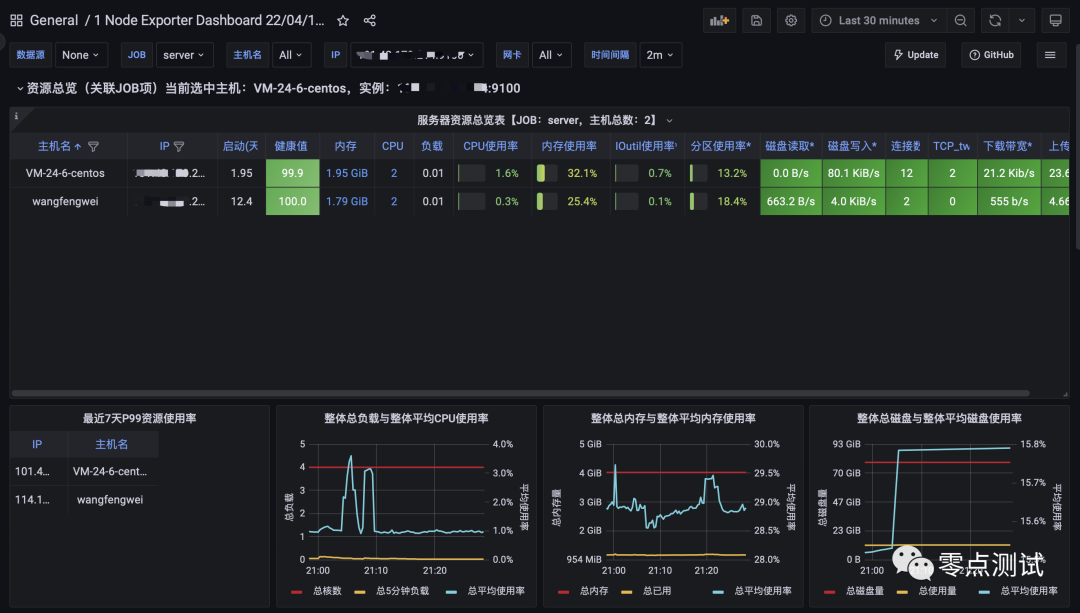
8.6 导入 mysql 监控模版(7362)
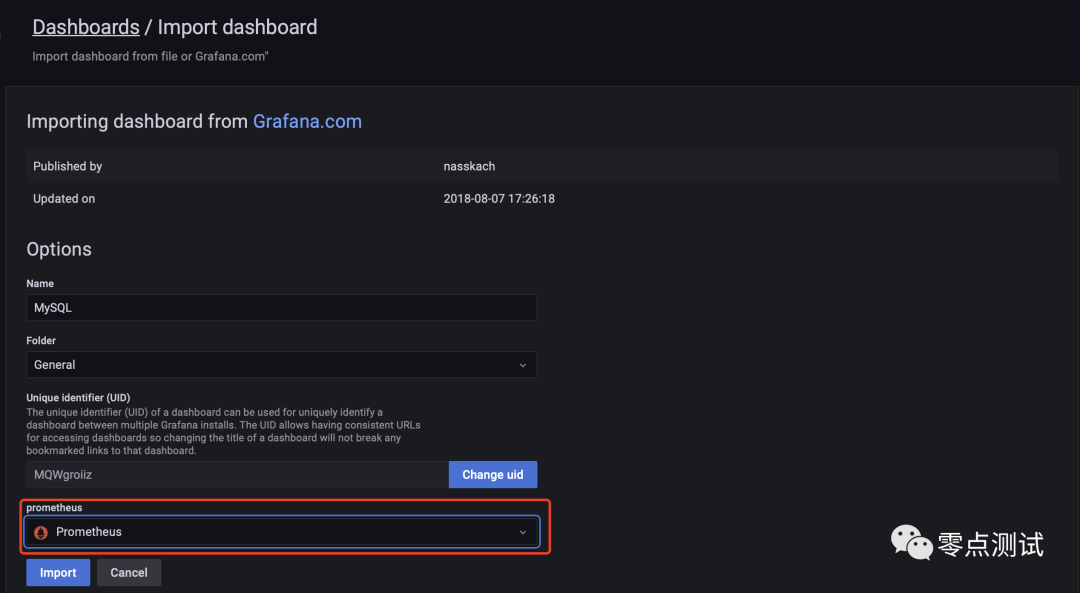
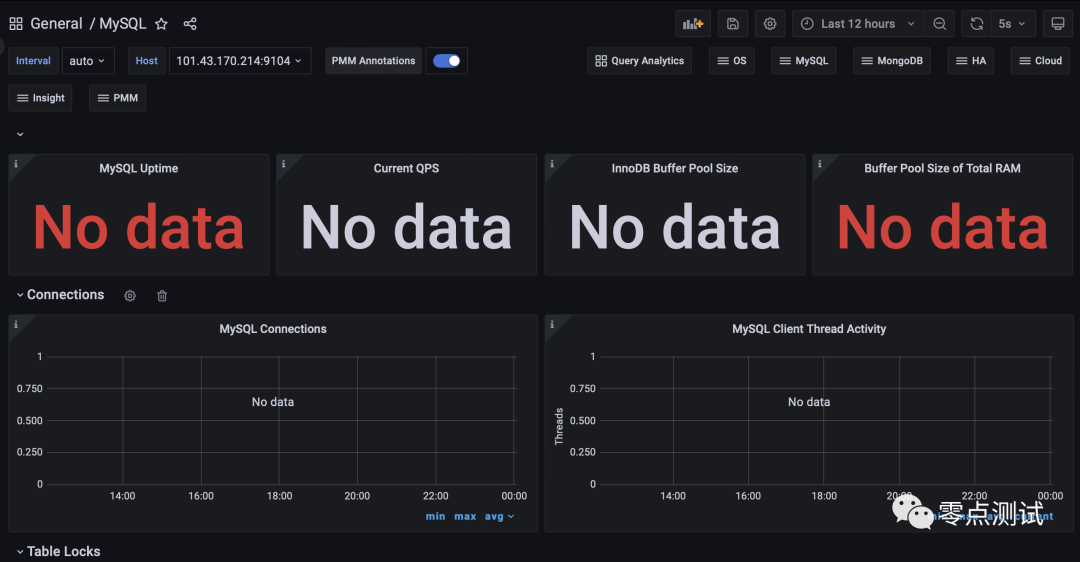
四.遇到的问题
1.安装 Docker 出现如下错误
[root@VM-24-6-centos wfw]# sudo yum install docker-ce
Loaded plugins: fastestmirror
Loading mirror speeds from cached hostfile
docker-ce-stable | 3.5 kB 00:00:00
http://mirrors.aliyun.com/docker-/repodata/repomd.xml: [Errno 14] HTTP Error 404 – Not Found
Trying other mirror.
To address this issue please refer to the below wiki article
https://wiki.centos.org/yum-errors
If above article doesn’t help to resolve this issue please use https://bugs.centos.org/.
One of the configured repositories failed (added from: http://mirrors.aliyun.com/docker-),
and yum doesn’t have enough cached data to continue. At this point the only
safe thing yum can do is fail. There are a few ways to work “fix” this:
1. Contact the upstream for the repository and get them to fix the problem.
2. Reconfigure the baseurl/etc. for the repository, to point to a working
upstream. This is most often useful if you are using a newer
distribution release than is supported by the repository (and the
packages for the previous distribution release still work).
3. Run the command with the repository temporarily disabled
yum –disablerepo=mirrors.aliyun.com_docker- …
4. Disable the repository permanently, so yum won’t use it by default. Yum
will then just ignore the repository until you permanently enable it
again or use –enablerepo for temporary usage:
yum-config-manager –disable mirrors.aliyun.com_docker-
or
subscription-manager repos –disable=mirrors.aliyun.com_docker-
5. Configure the failing repository to be skipped, if it is unavailable.
Note that yum will try to contact the repo. when it runs most commands,
so will have to try and fail each time (and thus. yum will be be much
slower). If it is a very temporary problem though, this is often a nice
compromise:
yum-config-manager –save –setopt=mirrors.aliyun.com_docker-.skip_if_unavailable=true
failure: repodata/repomd.xml from mirrors.aliyun.com_docker-: [Errno 256] No more mirrors to try.
http://mirrors.aliyun.com/docker-/repodata/repomd.xml: [Errno 14] HTTP Error 404 – Not Found
解决方案
进入 yum.repos.d 目录,删除掉 mirrors.aliyun.com_docker-.repo 重新安装即可
cd /etc/yum.repos.d/
rm -rf mirrors.aliyun.com_docker-.repo
sudo yum install docker-ce


![【学习强国】[挑战答题]带选项完整题库(2020年4月20日更新)-武穆逸仙](https://www.iwmyx.cn/wp-content/uploads/2019/12/timg-300x200.jpg)


![【学习强国】[新闻采编学习(记者证)]带选项完整题库(2019年11月1日更新)-武穆逸仙](https://www.iwmyx.cn/wp-content/uploads/2019/12/77ed36f4b18679ce54d4cebda306117e-300x200.jpg)
