什么是性能测试
在软件开发中,性能测试是一种常见的测试实践,用于确定系统在特定工作负载下的响应能力和稳定性表现。它还用于排查,观察,验证系统在其他方面的质量。例如可扩展性,可靠性和资源使用情况。
性能测试是测试工程的一个子集,是一种计算机科学实践,致力于将性能指标构建在系统的设计,实现和架构中。
相关概念解释
| 释意 | |
|---|---|
| QPS | 每秒查询率 Queries Per Second。每秒的响应请求数,也即是最大吞吐能力,是衡量服务器性能端一个重要指标。 |
| TPS | 每秒处理的事务数目 Transactions Per Second。每个 TPS 包含一个完整的请求流程(客户端请求服务端-> 服务端响应并处理【包含数据库访问】 -> 服务端返回给客户端) |
| RPS | 每秒吞吐率 Requests Per Second。指的是某个并发用户数下单位时间内处理的请求数。在不考虑事务的情况下可以近似与 TPS。 |
常见性能测试工具
由于我对其他测试框架不是很了解,这里只是简单的罗列,感兴趣的同学可以帮忙补充。关于这几种测试框架的对比,可以参考 Thoughtworks 的一篇洞见(文末有连接):
K6 介绍
K6 是一个基于 Go 语言实现的一个负载测试工具,其官网描述为: The best developer experience for load testing。具有如下关键特点:
- 提供对开发者友好的 CLI 工具
- 使用 JS/TS 进行脚本编写,支持本地和远程模块
- 提供 Check 和 Thresholds 功能,以目标为导向,友好的自动化测试
- 支持多种 DevOps 平台和可视化平台
常见性能测试类型
维基百科罗列了多达 8 种 性能测试类型,感兴趣的小伙伴可以查看文末连接查看更多详细内容。这里结合 K6 主要介绍如下几种测试类型如下几种常见的测试类型:
| 释意 | |
|---|---|
| Smoke testing | 中文释意为 冒烟测试。是一种常规测试。通过配置最小负载来验证系统的完整性。其主要目的是:验证测试脚本是否有问题;验证系统在最小负载情况下是否出现异常。 |
| Load testing | 中文释意为 负载测试。是一种重要的性能测试。主要关注根据并发用户数或每秒请求数评估系统的当前性能。其主要目的是:用于确定系统在正常和峰值条件下的行为,确保当许多用户同时访问应用程序时,应用程序的性能能达到令人满意的程度。 |
| Stress testing | 中文释意为 压力测试。用于确定系统的性能瓶颈。其主要目的是:验证系统在极端条件下的稳定性和可靠性。 |
| Soak testing | 中文释意为 浸泡测试。其主要目的是:通过较长时间的性能测试来发现系统长时间处于压力之下而导致的性能和可靠性问题。 |
关键词解释
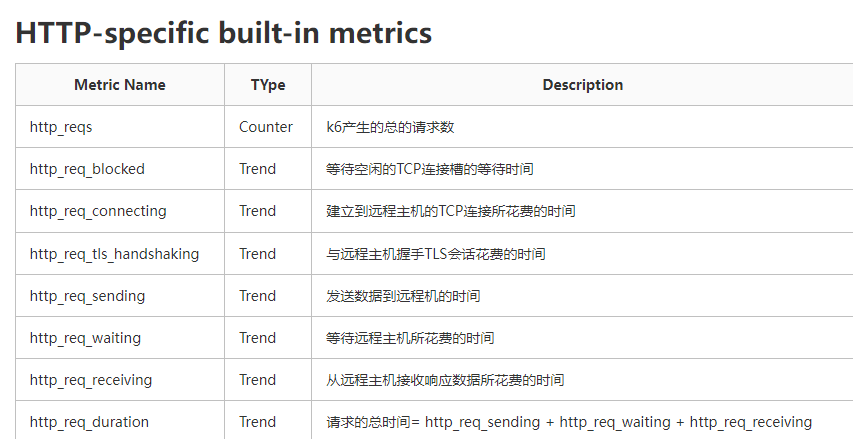
在 K6 中,通过一些参数配置可以模拟上述的测试场景。常见的参数如下所示:
| 释意 | |
|---|---|
| vus | 当前并发数(虚拟用户数) |
| vus_max | 最大并发数(虚拟用户的最大数量) |
| rps | 每秒并发请求数 |
| duration | 持续运行时间 |
| checks | 断言成功率 |
| data_sent | 发送的数据量 |
| data_received | 接收到的数据量 |
| iterations | 测试中的 vu 执行 js 脚本(default 函数)的总次数 |
| iteration_duration | 完成默认/主函数的完整迭代所花费的时间 |
环境搭建
k6 支持 Linux,Mac,Windows,Docker 方式来安装,安装方法也很简单,可以结合自己的实际环境,参考官网的安装方式进行本地环境安装:Installation
常用命令
K6 提供两种方式进行压测场景的模拟,一种是 CLI,另一种就是通过 JS 脚本,这里先罗列一下常用的 CLI 命令:
k6 help [command] [flags]

# 将测试在 K6 的云端服务执行,需要提前注册 K6 账号并登录
k6 login [flags]
k6 cloud [flags]

# 检查脚本
k6 inspect [file] [flags]

# 执行 load test(本地)
k6 run [flags]

# 暂停测试
k6 pause [flags]

# 恢复测试
k6 resume [flags]

# 扩展测试
k6 scale [flags]

# 显示测试状态
k6 stats [flags]

# 显示版本
k6 version [flags]

# 模拟 10 个虚拟用户(VU),连续压测 30 秒:
k6 run --vus 10 --duration 30s script.js
示例展示
本地压测
这里采用 .NET 6 中的 MinimalAPI 的方式构建了 2 个测试路由:
- GetWeatherForecastV1:使用 for 循环的方式并行构建 1_000_000 个对象
- GetWeatherForecastV2:使用 Parallel 并行构建 1_000_000 个对象
示例代码如下所示:
const int maxLength = 1_000_000;

app.MapGet("/GetWeatherForecastV1",  () =>
{
    var forecast = new object[maxLength];
    for (var i = 0; i < forecast.Length; i++) { forecast[i] = new { Date = DateTime.Now.AddDays(i), temperatureC = Random.Shared.Next(-20, 55), }; } return Results.Ok(forecast.Length); }).WithName("GetWeatherForecastV1"); app.MapGet("/GetWeatherForecastV2", () =>
{
    var forecast = new object[maxLength];
    Parallel.For(0, maxLength, i =>
    {
        forecast[i] = new
        {
            Date = DateTime.Now.AddDays(i),
            temperatureC = Random.Shared.Next(-20, 55),
        };
    });

    return Results.Ok(forecast.Length);
}).WithName("GetWeatherForecastV2");
创建一个 JS 脚本 sample-test.js,内容一下所示:
import http from "k6/http";
import { check, sleep } from "k6";

export const options = {
  insecureSkipTLSVerify: true, // skip TLS verify
  noConnectionReuse: false, // disable keep-alive connections
  vus: 1, // 1 user looping for 10 seconds
  duration: "10s",
};

const BASE_URL = "http://localhost:5188";

export default () => {
  const resp = http.get(`${BASE_URL}/GetWeatherForecastV1`);
  check(resp, { "status = 200": resp.status === 200 });
  sleep(1); // Suspend VU execution for the specified duration.
};
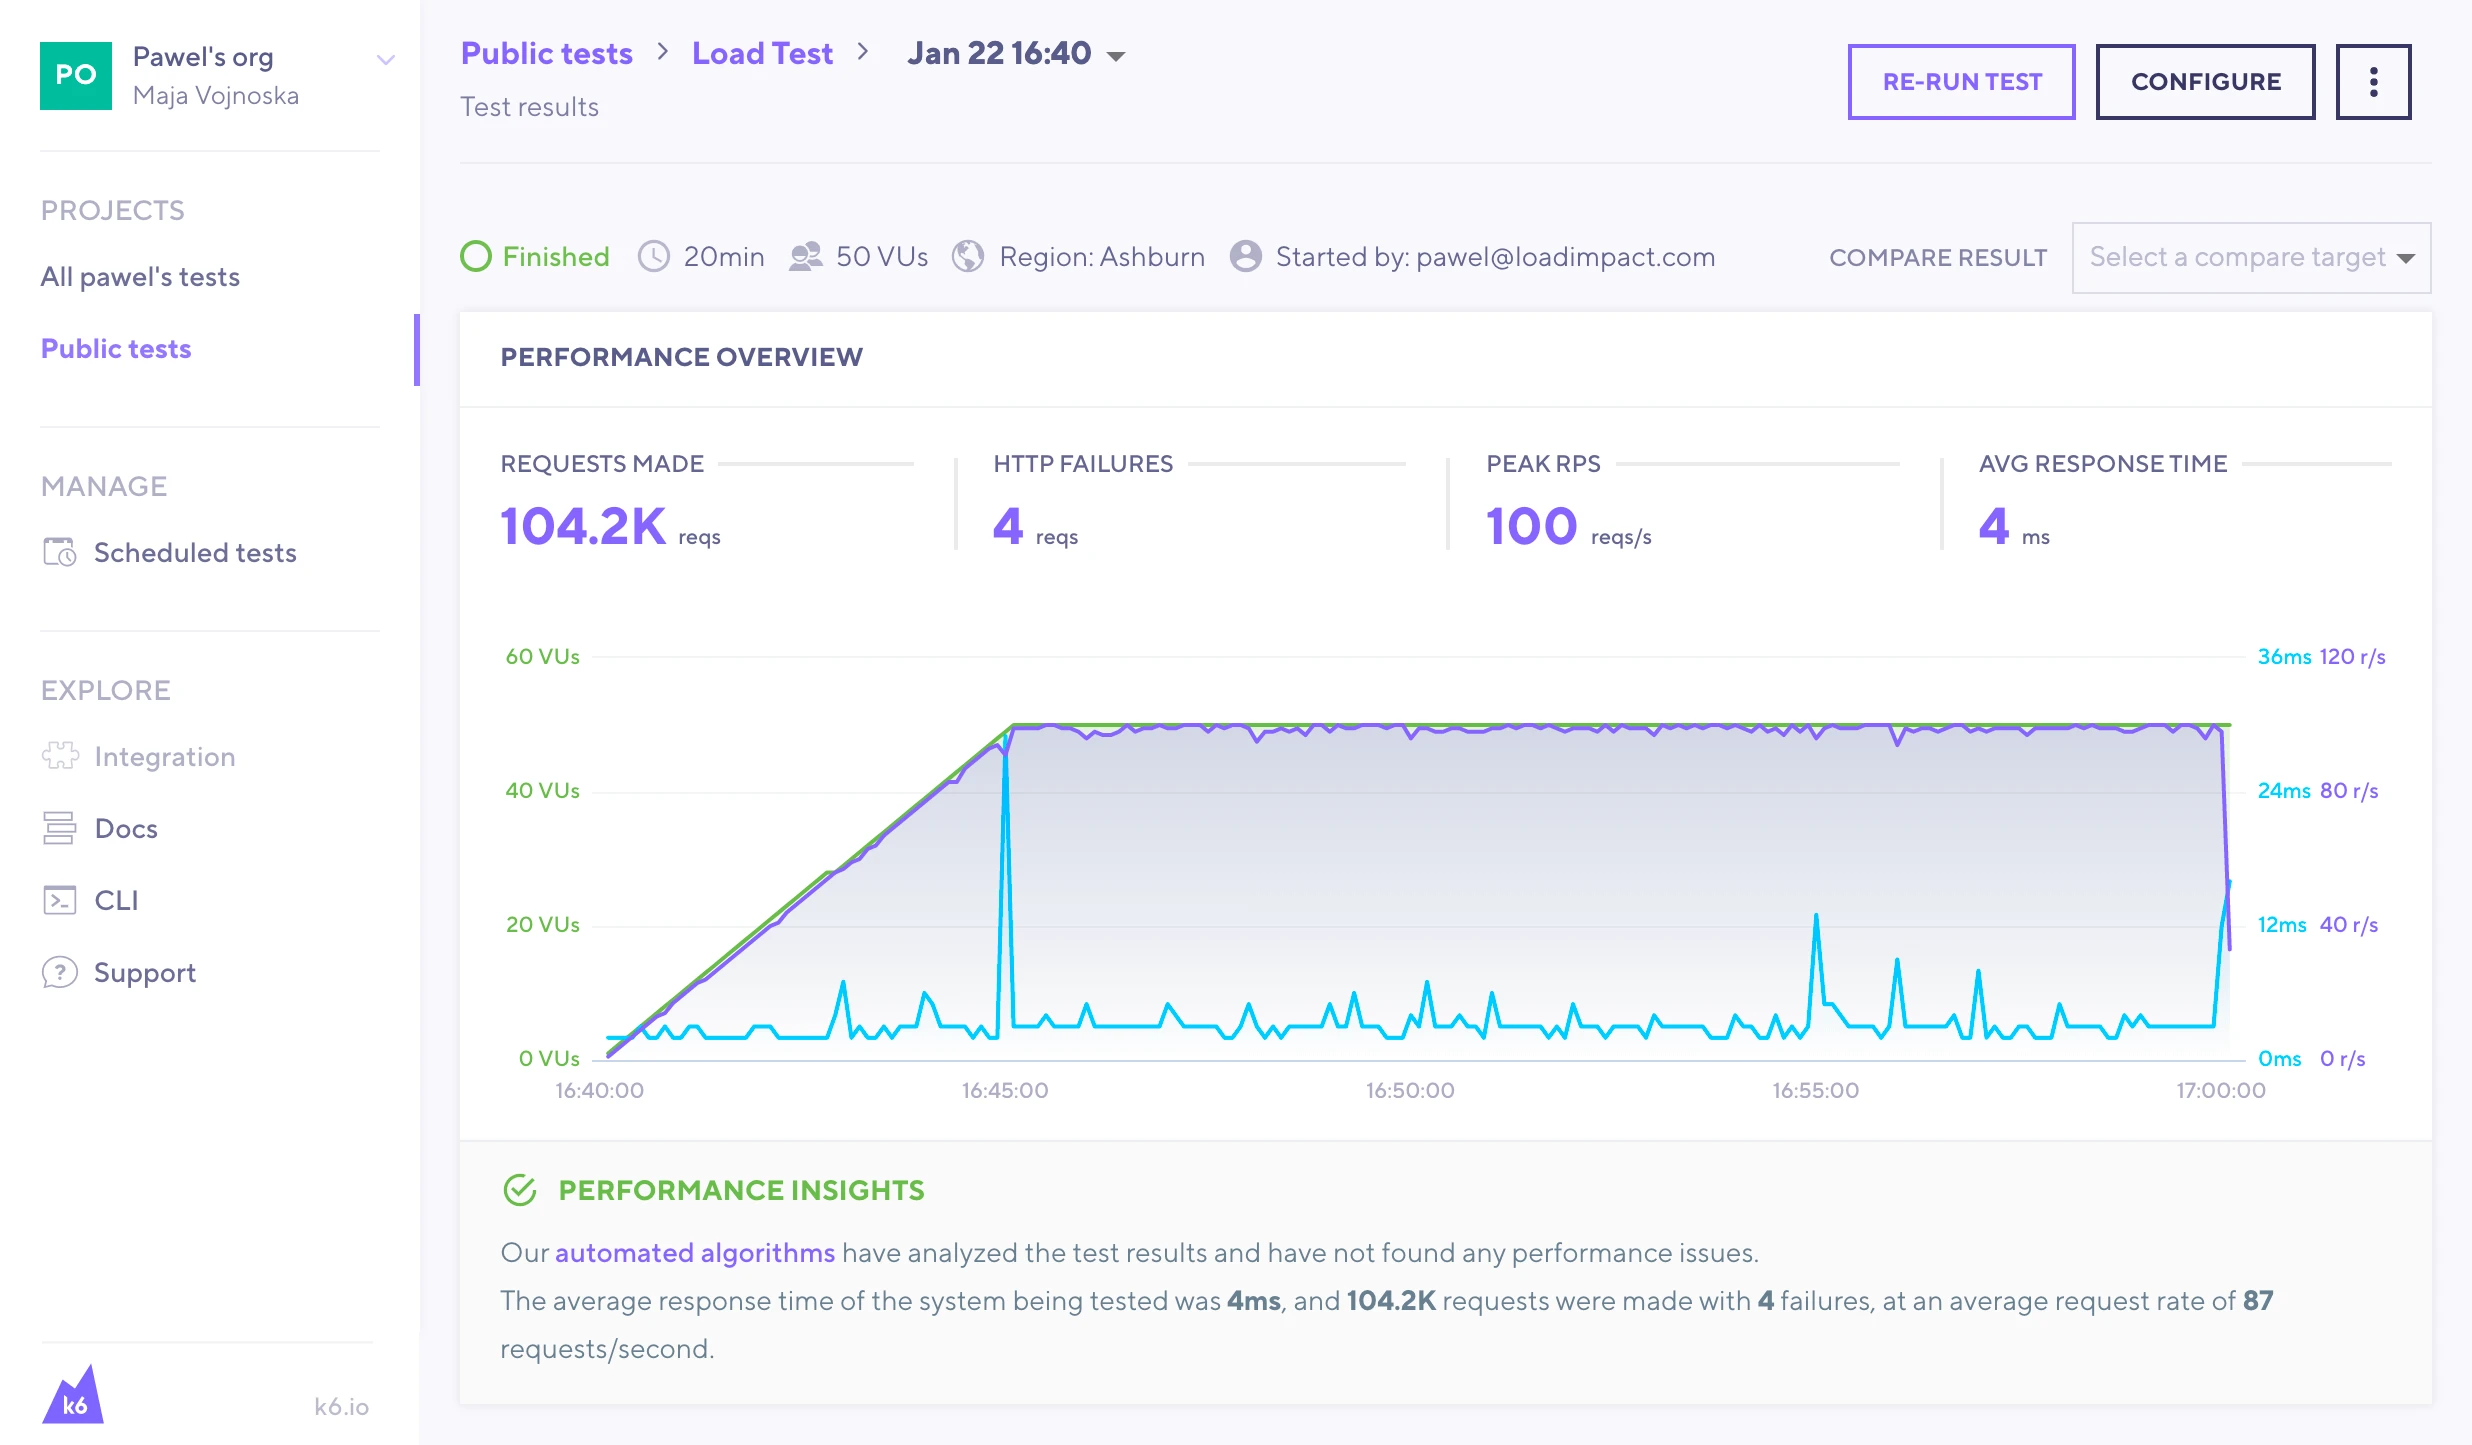
类似的结果如下图所示:
注:由于在 K6 的云端来跑脚本的话,需要脚本里面对应的接口可以供其访问,所以可以尝试先将应用部署到外网可访问后再进行这种方式。
集成 Azure Pipelines
此外,K6 还支持集成至 Azure Pipelines 中进行压测,目前 Azure Pipelines 的 Marketplace 已经提供来 k6 Load Testing 插件,可以尝试将其安装至自己的组织中进行使用。
具体使用方式可以参考文末的相关链接。
结果可视化
最后需要介绍的就是结果可视化,目前 K6 支持多种结果可视化方案,比如:Amazon CloudWatch,Cloud,CSV,Datadog…,我们可以根据自己项目的实际情况使用合适的可视化方案。
相关参考
- 如何使用 k6 做性能测试
- k6 负载测试学习知识
- Software performance testing
- K6
- Load testing with Azure Pipelines
- Load Testing With Azure DevOps And K6
- On .NET Live – Performance and Load testing with k6
- Getting started with API Load Testing (Stress, Spike, Load, Soak)
k6 包含许多功能,您可以在文档中了解所有这些功能。主要功能包括:
带有开发人员友好 API 的 CLI 工具。
在 JavaScript ES2015/ES6 中编写脚本 – 支持本地和远程模块
检查 和阈值- 用于面向目标、自动化友好的负载测试
用例
k6 用户通常是开发人员、QA 工程师和 DevOps。他们使用 k6 来测试 API、微服务和网站的性能。常见的 k6 用例是:
**负载测试**
k6 针对系统资源的最小消耗进行了优化。它是一种高性能工具,专为在预生产和 QA 环境中运行高负载测试(尖峰、压力、浸泡测试)而设计。**性能监控**
k6 为性能测试自动化提供了很好的原语。您可以使用少量负载运行测试,以持续监控生产环境的性能。
安装
Debian/Ubuntu
# 如果您使用的图像缺少 ca-证书 或者 gnupg2
#某些图像不与 ca-证书 和 gnupg2 开箱即用的包裹。如果您使用这样的镜像,首先需要使用以下命令安装这些包:sudo apt-get update && sudo apt-get install ca-certificates gnupg2 -y
sudo apt-key adv –keyserver hkp://keyserver.ubuntu.com:80 –recv-keys C5AD17C747E3415A3642D57D77C6C491D6AC1D69
echo “deb https://dl.k6.io/deb stable main” | sudo tee /etc/apt/sources.list.d/k6.list
sudo apt-get update
sudo apt-get install k6
Fedora/CentOS
使用 天狼星 或者 百胜 在旧版本上:
sudo dnf install https://dl.k6.io/rpm/repo.rpm
sudo dnf install k6
Windows
下载安装包 k6-latest-amd64.msi 安装
DOS 下执行:k6 run D:\testjs\localhost.js >d:\testjs\localhost.txt
二进制安装
选择一个版本 Releases page 下载后,并将其放入您的 PATH 运行 k6 从任何位置
wget https://github.com/grafana/k6/releases/download/v0.34.1/k6-v0.34.1-linux-amd64.tar.gz
tar -xvf k6-v0.34.1-linux-amd64.tar.gz
sudo mv k6-v0.34.1-linux-amd64/k6 /usr/local/bin/
Docker
docker pull grafana/k6
docker run -i grafana/k6 run – <script.js
官方文档地址: https://k6.io/docs/
脚本:
A:
import check from "k6";
import http from "k6/http";

export let options = {
    duration:'1m', //持续运行时间
    vus: 10,       //并发数
    rps: 10        //每秒并发多少
};

/**
export let options = {
  stages: [
    { duration: '5m', target: 60 },  // simulate ramp-up of traffic from 1 to 60 users over 5 minutes.
    { duration: '10m', target: 60 }, // stay at 60 users for 10 minutes
    { duration: '3m', target: 100 }, // ramp-up to 100 users over 3 minutes (peak hour starts)
    { duration: '2m', target: 100 },  // stay at 100 users for short amount of time (peak hour)
    { duration: '3m', target: 60 },  // ramp-down to 60 users over 3 minutes (peak hour ends)
    { duration: '10m', target: 60 },  // continue at 60 for additional 10 minutes
    { duration: '5m', target: 0 },   // ramp-down to 0 users
  ],
  thresholds: {
    http_req_duration: ['p(99)<1500'], // 99% of requests must complete below 1.5s
  },
};
**/

export default function() {
    http.get("http://localhost/web?site=jysj&page=index");

    /**
    for (var id = 1; id <= 100; id++) {
      http.get(`http://example.com/posts/${id}`, {
           tags: { name: 'PostsItemURL' },
      });
    }
    **/
};
POST 示例: postdemo.js
import http from 'k6/http';

export let options = {
    duration:'1m', //持续运行时间
    vus: 10,       //并发数
    rps: 10        //每秒并发多少
};

export default function () {
  var url = 'http://test.k6.io/login';
  var payload = JSON.stringify({
    email: 'aaa',
    password: 'bbb',
  });

  var params = {
    headers: {
      'Content-Type': 'application/json',
    },
  };

  http.post(url, payload, params);
}
批量示例:batchdemo.js
import http from 'k6/http';
import { check } from 'k6';

export let options = {
    duration:'1m', //持续运行时间
    vus: 10,       //并发数
    rps: 10        //每秒并发多少
};

export default function () {
  let responses = http.batch([
    ['GET', 'https://test.k6.io', null, { tags: { ctype: 'html' } }],
    ['GET', 'https://test.k6.io/style.css', null, { tags: { ctype: 'css' } }],
    [
      'GET',
      'https://test.k6.io/images/logo.png',
      null,
      { tags: { ctype: 'images' } },
    ],
  ]);
  check(responses[0], {
    'main page status was 200': (res) => res.status === 200,
  });
}
import http from 'k6/http';
import { check } from 'k6';
export let options = {
duration:'1m', //持续运行时间
vus: 10, //并发数
rps: 10 //每秒并发多少
};
export default function () {
let req1 = {
method: 'GET',
url: 'https://httpbin.org/get',
};
let req2 = {
method: 'GET',
url: 'https://test.k6.io',
};
let req3 = {
method: 'POST',
url: 'https://httpbin.org/post',
body: {
hello: 'world!',
},
params: {
headers: { 'Content-Type': 'application/x-www-form-urlencoded' },
},
};
let responses = http.batch([req1, req2, req3]);
// httpbin.org should return our POST data in the response body, so
// we check the third response object to see that the POST worked.
check(responses[2], {
'form data OK': (res) => JSON.parse(res.body)['form']['hello'] == 'world!',
});
}import http from 'k6/http';
import { check } from 'k6';
//docker run -i loadimpact/k6 run - <wmyx.js
export let options = {
userAgent: 'StarK6 Mozilla/5.0 (Windows NT 10.0; Win64; x64) AppleWebKit/537.36 (KHTML, like Gecko) Chrome/100.0.4896.127 Safari/537.36',
referer:"https://www.baidu.com",
duration:'1m', //持续运行时间
vus: 10, //并发数 每秒发出的最大请求数
rps: 10 //每秒并发多少
};
export default function () {
let responses = http.batch([
['GET', 'https://www.www.baidu.com/', null, { tags: { ctype: 'html' } }],
['GET', 'https://test.k6.io/style.css', null, { tags: { ctype: 'css' } }],
['GET','https://test.k6.io/logo.png',null, { tags: { ctype: 'images' } },
],
]);
check(responses[0], {
'main page status was 200': (res) => res.status === 200,
});
}
冒烟测试
冒烟测试是常规负载测试,配置为最小负载。在每次编写新脚本或修改现有脚本时都进行冒烟测试,以进行完整性检查。
运行烟雾测试以:
验证测试脚本没有错误。
验证系统在最小负载下没有引发任何错误。
import http from 'k6/http';
import { check, group, sleep, fail } from 'k6';

export let options = {
  vus: 1, // 1 user looping for 1 minute
  duration: '1m',

  thresholds: {
    http_req_duration: ['p(99)<1500'], // 99% of requests must complete below 1.5s
  },
};

const BASE_URL = 'https://test-api.k6.io';
const USERNAME = 'TestUser';
const PASSWORD = 'SuperCroc2020';

export default () => {
  let loginRes = http.post(`${BASE_URL}/auth/token/login/`, {
    username: USERNAME,
    password: PASSWORD,
  });

  check(loginRes, {
    'logged in successfully': (resp) => resp.json('access') !== '',
  });

  let authHeaders = {
    headers: {
      Authorization: `Bearer ${loginRes.json('access')}`,
    },
  };

  let myObjects = http.get(`${BASE_URL}/my/crocodiles/`, authHeaders).json();
  check(myObjects, { 'retrieved crocodiles': (obj) => obj.length > 0 });

  sleep(1);
};
负载测试
什么是负载测试?
负载测试是一种性能测试,用于确定系统在正常和峰值条件下的行为。
负载测试用于确保许多用户同时访问该应用程序时其性能令人满意。假设在高峰时段平均看到 60 个并发用户,而 100 个用户。
在正常时间和高峰时间都达到性能目标可能很重要,因此建议在配置负载测试时考虑到高负载-在这种情况下为 100 个用户。
给出负载测试的参数如下,脚本其余部分不变,沿用冒烟测试部分
export let options = {
  stages: [
    { duration: '5m', target: 100 }, // simulate ramp-up of traffic from 1 to 100 users over 5 minutes.
    { duration: '10m', target: 100 }, // stay at 100 users for 10 minutes
    { duration: '5m', target: 0 }, // ramp-down to 0 users
  ],
  //用户数从 0 开始,然后逐渐增加到标称值,并在该标称值上保留很长时间
  thresholds: {
    http_req_duration: ['p(99)<1500'], // 99% of requests must complete below 1.5s
    'logged in successfully': ['p(99)<1500'], // 99% of requests must complete below 1.5s
  },
};
模拟正常的一天,配置如下,其余脚本不变:
export let options = {
  stages: [
    { duration: '5m', target: 60 }, // simulate ramp-up of traffic from 1 to 60 users over 5 minutes.
    { duration: '10m', target: 60 }, // stay at 60 users for 10 minutes
    { duration: '3m', target: 100 }, // ramp-up to 100 users over 3 minutes (peak hour starts)
    { duration: '2m', target: 100 }, // stay at 100 users for short amount of time (peak hour)
    { duration: '3m', target: 60 }, // ramp-down to 60 users over 3 minutes (peak hour ends)
    { duration: '10m', target: 60 }, // continue at 60 for additional 10 minutes
    { duration: '5m', target: 0 }, // ramp-down to 0 users
  ],
  //在一天中的大部分时间内保持 60 个用户的使用状态,并在高峰时段运行时增加到 100 个用户,
  //然后再降低到正常负载
  thresholds: {
    http_req_duration: ['p(99)<1500'], // 99% of requests must complete below 1.5s
  },
};
如果系统在负载测试下崩溃,则意味着负载测试已转变为压力测试
压力测试是一种负载测试,用于确定系统的限制。该测试的目的是验证系统在极端条件下的稳定性和可靠性。
压力测试应该分多个步骤进行配置,每个步骤都会增加系统的并发负载。
import http from 'k6/http';
import { sleep } from 'k6';

export let options = {
  stages: [
    { duration: '2m', target: 100 }, // below normal load
    { duration: '5m', target: 100 },
    { duration: '2m', target: 200 }, // normal load
    { duration: '5m', target: 200 },
    { duration: '2m', target: 300 }, // around the breaking point
    { duration: '5m', target: 300 },
    { duration: '2m', target: 400 }, // beyond the breaking point
    { duration: '5m', target: 400 },
    { duration: '10m', target: 0 }, // scale down. Recovery stage.
  ],
};
//每 2 分钟增加 100 个用户的负载,并在此级别保持 5 分钟。
//最后,还包括一个恢复阶段,在该阶段,系统逐渐将负载降低到 0

export default function () {
  const BASE_URL = 'https://test-api.k6.io'; // make sure this is not production

  let responses = http.batch([
    [
      'GET',
      `${BASE_URL}/public/crocodiles/1/`,
      null,
      { tags: { name: 'PublicCrocs' } },
    ],
    [
      'GET',
      `${BASE_URL}/public/crocodiles/2/`,
      null,
      { tags: { name: 'PublicCrocs' } },
    ],
    [
      'GET',
      `${BASE_URL}/public/crocodiles/3/`,
      null,
      { tags: { name: 'PublicCrocs' } },
    ],
    [
      'GET',
      `${BASE_URL}/public/crocodiles/4/`,
      null,
      { tags: { name: 'PublicCrocs' } },
    ],
  ]);

  sleep(1);
}
峰值测试
峰值测试是压力测试的一种变体,但它不会逐渐增加负载,而是会在很短的时间范围内达到峰值负载。
给出峰值测试的参数如下,脚本其余部分不变,沿用压力测试部分
export let options = {
  stages: [
    { duration: '10s', target: 100 }, // below normal load
    { duration: '1m', target: 100 },
    { duration: '10s', target: 1400 }, // spike to 1400 users
    { duration: '3m', target: 1400 }, // stay at 1400 for 3 minutes
    { duration: '10s', target: 100 }, // scale down. Recovery stage.
    { duration: '3m', target: 100 },
    { duration: '10s', target: 0 },
  ],
};
//测试从低负载的 1 分钟开始,然后快速上升到非常高的负载,然后是低负载的恢复期
浸泡测试
负载测试主要与性能评估而言,压力测试涉及在极端条件下系统稳定,浸泡测试则侧重在长时间涉及可靠性。
浸泡测试的持续时间应以小时为单位。建议从 1 小时的测试开始,一旦成功,则将其扩展到几个小时。有些错误与时间有关,与执行的请求总数无关。
浸泡测试可帮助您发现长时间内出现的错误和可靠性问题。许多复杂的系统都有这种性质的错误。
标准负载测试成功后,应该执行浸泡测试,并且在执行压力测试时发现系统稳定。
浸泡测试是构建可靠系统的最后一步。
import http from 'k6/http';
import { sleep } from 'k6';

export let options = {
  stages: [
    { duration: '2m', target: 400 }, // ramp up to 400 users
    { duration: '3h56m', target: 400 }, // stay at 400 for ~4 hours
    { duration: '2m', target: 0 }, // scale down. (optional)
  ],
};

const API_BASE_URL = 'https://test-api.k6.io';

export default function () {
  http.batch([
    ['GET', `${API_BASE_URL}/public/crocodiles/1/`],
    ['GET', `${API_BASE_URL}/public/crocodiles/2/`],
    ['GET', `${API_BASE_URL}/public/crocodiles/3/`],
    ['GET', `${API_BASE_URL}/public/crocodiles/4/`],
  ]);

  sleep(1);
}
用户流测试
在以下示例中,您将看到四个连续的 HTTP 请求发送到 API,以登录,获取用户配置文件,更新用户配置文件并最终注销。每个请求都有其独特的特征,接受一些参数,最后返回一个 response,并根据一组规则进行检查。在每次请求和响应之后,我们也会暂停,以使 API 能够保持正常运行而不会被淹没。在脚本的开头,我们还添加了一组用于控制脚本的选项。
如您所见,这是一个相当正常但简单的用户流程,它试图模仿使用我们的移动应用程序或网站时的用户行为。为了简单起见,仅显示了四个请求,但是您可以轻松添加其他请求以具有更真实的用户体验。这样,您可以在应用程序或平台中测试用户导航的流程。这一点将 k6 与大多数当前可用的负载测试工具区分开来,因为它可以用于测试现实的用户流,而不仅仅是依赖锤击一组端点。
import http from 'k6/http';
import { check, sleep } from 'k6';

let options = {
  vus: 1000,
  duration: '600s',
};
const SLEEP_DURATION = 0.1;

export default function () {
  let body = JSON.stringify({
    username: 'user_' + __ITER,
    password: 'PASSWORD',
  });
  let params = {
    headers: {
      'Content-Type': 'application/json',
    },
    tags: {
      name: 'login', // first request
    },
  };

  group('simple user journey', (_) => {
    // Login request
    let login_response = http.post(
      'http://api.yourplatform.com/v2/login',
      body,
      params,
    );
    check(login_response, {
      'is status 200': (r) => r.status === 200,
      'is api key present': (r) => r.json().hasOwnProperty('api_key'),
    });
    params.headers['api-key'] = login_response.json()['api_key'];
    sleep(SLEEP_DURATION);

    // Get user profile request
    params.tags.name = 'get-user-profile';
    let user_profile_response = http.get(
      'http://api.yourplatform.com/v2/users/user_' + __ITER + '/profile',
      params,
    );
    sleep(SLEEP_DURATION);

    // Update user profile request
    body = JSON.string({
      first_name: 'user_' + __ITER,
    });
    params.tags.name = 'update-user-profile';
    let update_profile_response = http.post(
      'http://api.yourplatform.com/v2/users/user_' + __ITER + '/profile',
      body,
      params,
    );
    sleep(SLEEP_DURATION);

    // Logout request
    params.tags.name = 'logout';
    let logout_response = http.get(
      'http://api.yourplatform.com/v2/logout',
      params,
    );
    sleep(SLEEP_DURATION);
  });
}


![【学习强国】[挑战答题]带选项完整题库(2020年4月20日更新)-武穆逸仙](https://www.iwmyx.cn/wp-content/uploads/2019/12/timg-300x200.jpg)


![【学习强国】[新闻采编学习(记者证)]带选项完整题库(2019年11月1日更新)-武穆逸仙](https://www.iwmyx.cn/wp-content/uploads/2019/12/77ed36f4b18679ce54d4cebda306117e-300x200.jpg)
![[压力测试]JMeter创建web测试计划-武穆逸仙](https://www.iwmyx.cn/wp-content/uploads/2021/11/2cd661b4d41c.png)
![[压力测试]JMeter下载及安装配置完整版-武穆逸仙](https://www.iwmyx.cn/wp-content/uploads/2021/11/56fab0348b5d.png)
