前 言
随着数据量的激增,搜索引擎对处理海量数据的需求日益增长。ElasticSearch 作为目前最流行的开源搜索引擎,正在被越来越多的企业所认可。但是 ElasticSearch 也存在单机容量受限,可靠性难以保证的问题。因此,搭建一个高可用、易扩展的 ElasticSearch 集群变得尤为重要。
本文将围绕 ElasticSearch 7.9.3 版本,通过多种实践案例,提供集群搭建的详细指南。内容涵盖操作系统优化、集群拓扑设计、重要组件配置等。
我们的目标是帮助读者掌握搭建一个稳定、高效、易于管理的 ElasticSearch 生产集群所需要的核心知识和技能。
环境准备
2.1 集群架构
|
|
|
|
|
|
|
|
|
|
主节点 |
|
|
|
|
|
|
|
|
|
2.2 操作系统参数配置
1)/etc/sysctl.conf 增加一下参数
vi /etc/sysctl.conf
vm.max_map_count=655360
vm.swappiness = 1
2)使配置生效
sysctl -p3)关闭 swap
swapoff -a4)查看打开文件数
lsof -u hnivory |wc -l/etc/security/limits.conf 增加以下参数:
vi /etc/security/limits.conf

* soft nofile 655360
* hard nofile 655360
* soft nproc unlimited
* hard nproc unlimited
* soft memlock unlimited
* hard memlock unlimited
5)/etc/security/limits.d/20-nproc.conf 增加以下参数
vi /etc/security/limits.d/20-nproc.conf

* soft nproc 655360
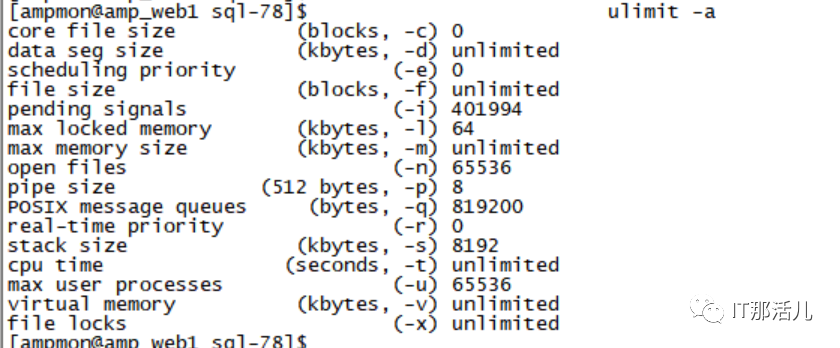
6)检查用户配置是否生效
ulimit -a
2.3 禁用防火墙
systemctl status firewalld --- 查看防火墙状态
systemctl stop firewalld --- 临时关闭防火墙
systemctl disable firewalld ---禁止开机启动防火墙
2.4 禁用 SELinux
vi /etc/selinux/config

# This file controls the state of SELinux on the system.
# SELINUX= can take one of these three values:
# enforcing - SELinux security policy is enforced.
# permissive - SELinux prints warnings instead of enforcing.
# disabled - SELinux is fully disabled.
SELINUX=disabled
# SELINUXTYPE= type of policy in use. Possible values are:
# targeted - Only targeted network daemons are protected.
# strict - Full SELinux protection.
SELINUXTYPE=targeted
搭建 ES 集群
3.1 创建 elastic 用户,ES 安装目录
1)创建用户组
/usr/sbin/groupadd -g 1111 elastic2)创建用户
/usr/sbin/useradd -u 1112 -g elastic -d /home/elastic elastic3)创建安装目录(根据实际节点数创建目录)
mkdir -p /app/node_$IP_9200
chown elastic:elastic /app/node_$IP_9200
4)创建数据目录
9200 为端口号,根据实际节点创建数据目录,一个端口节点对应一个数据目录。
mkdir -p /data{1..8}/920{0..4}

chown -R elastic:elastic /data1
chown -R elastic:elastic /data2
chown -R elastic:elastic /data3
chown -R elastic:elastic /data4
chown -R elastic:elastic /data5
chown -R elastic:elastic /data6
chown -R elastic:elastic /data7
chown -R elastic:elastic /data8
3.2 安装包下载及解压
官方下载地址 https://www.elastic.co/cn/downloads/elasticsearch

3.3 JDK 版本确认,JAVA 路径配置
确认操作系统使用的 JDK 版本,要求使用 ES 自带的 JDK 启动。
java -version使用 Elasticsearch 自带的 jdk。
vi /etc/profile

export JAVA_HOME=/app/node_$IP_$PORT/elasticsearch/jdk
export PATH=$JAVA_HOME/bin:$PATH
使配置生效:
source /etc/profile如主机上有多个程序需要使用 JDK 无法修改主机 profile,可使用以下方式:
vi /app/$IP_$PORT/elasticsearch/bin/elasticsearch

#添加:
if [ -x "$JAVA_HOME/bin/java" ]; then
JAVA=" /app/node_$IP_$PORT/elasticsearch/jdk/bin/java"
else
JAVA=`which java`
fi
3.4 生成证书
cd /app/app/node_$IP_$PORT/elasticsearch生成 ca 证书,过期时间为 3650 天。
./bin/elasticsearch-certutil ca --pem --out ca.zip --days 3650 -s解压 ca.zip 文件:
unzip ca.zip

./bin/elasticsearch-certutil cert --ca-cert ca/ca.crt --ca-key ca/ca.key --pem --name elasticsearch-7.9.3 --out elasticsearch-7.9.3.zip --days 3650 -s
3.5 JVM 参数配置
cd /app/node_$IP_$PORT/elasticsearch/config
vi jvm.options
################################################################
##
## JVM configuration
##
################################################################
##
## WARNING: DO NOT EDIT THIS FILE. If you want to override the
## JVM options in this file, or set any additional options, you
## should create one or more files in the jvm.options.d
## directory containing your adjustments.
##
## See https://www.elastic.co/guide/en/elasticsearch/reference/7.15/jvm-options.html
## for more information.
##
################################################################

################################################################
## IMPORTANT: JVM heap size
################################################################
##
## The heap size is automatically configured by Elasticsearch
## based on the available memory in your system and the roles
## each node is configured to fulfill. If specifying heap is
## required, it should be done through a file in jvm.options.d,
## and the min and max should be set to the same value. For
## example, to set the heap to 4 GB, create a new file in the
## jvm.options.d directory containing these lines:
##
-Xms31g
-Xmx31g
##
## See https://www.elastic.co/guide/en/elasticsearch/reference/7.15/heap-size.html
## for more information
##
################################################################

################################################################
## Expert settings
################################################################
##
## All settings below here are considered expert settings. Do
## not adjust them unless you understand what you are doing. Do
## not edit them in this file; instead, create a new file in the
## jvm.options.d directory containing your adjustments.
##
################################################################

## GC configuration
8-13:-XX:+UseConcMarkSweepGC
8-13:-XX:CMSInitiatingOccupancyFraction=75
8-13:-XX:+UseCMSInitiatingOccupancyOnly

## G1GC Configuration
# NOTE: G1 GC is only supported on JDK version 10 or later
# to use G1GC, uncomment the next two lines and update the version on the
# following three lines to your version of the JDK
# 10-13:-XX:-UseConcMarkSweepGC
# 10-13:-XX:-UseCMSInitiatingOccupancyOnly
14-:-XX:+UseG1GC
14-:-XX:MaxGCPauseMillis=50
## JVM temporary directory
-Djava.io.tmpdir=${ES_TMPDIR}

## heap dumps

# generate a heap dump when an allocation from the Java heap fails; heap dumps
# are created in the working directory of the JVM unless an alternative path is
# specified
-XX:+HeapDumpOnOutOfMemoryError

# specify an alternative path for heap dumps; ensure the directory exists and
# has sufficient space
-XX:HeapDumpPath=data

# specify an alternative path for JVM fatal error logs
-XX:ErrorFile=logs/hs_err_pid%p.log

## JDK 8 GC logging
8:-XX:+PrintGCDetails
8:-XX:+PrintGCDateStamps
8:-XX:+PrintTenuringDistribution
8:-XX:+PrintGCApplicationStoppedTime
8:-Xloggc:logs/gc.log
8:-XX:+UseGCLogFileRotation
8:-XX:NumberOfGCLogFiles=32
8:-XX:GCLogFileSize=64m

# JDK 9+ GC logging
9-:-Xlog:gc*,gc+age=trace,safepoint:file=logs/gc.log:utctime,pid,tags:filecount=32,filesize=64m

-Dlog4j2.formatMsgNoLookups=true
3.6 elasticsearch 参数配置
cd /app/node_$IP_$PORT/elasticsearch/config
vi elasticsearch.yml

# Use a descriptive name for your cluster:
cluster.name: HN_ZDHYWPT_ES
#集群名称根据实际调整
# Use a descriptive name for the node:
#节点名称
node.name: node_xxxxxx_9201
#节点身份
node.roles: [ master ]
node.roles: [ data ]
#因为 kibana 需要聚合运算,所以把协调节点和聚合节点结合
node.roles: [ ingest ]
#节点名称根据实际调整
#主节点 master 为 true,data 为 false
#数据节点 master 为 false,data 为 true
#协调节点 master 为 false,data 为 false,开启 ingest
# Path to directory where to store the data (separate multiple locations by comma):
#数据存储路径
path.data: /data1/9201,/data2/9201,/data3/9201,/data4/9201,/data5/9201,/data6/9201,/data7/9201,/data8/9201
# Path to log files:
#path.logs: /path/to/logs
# Lock the memory on startup:
bootstrap.memory_lock: true
# Set the bind address to a specific IP (IPv4 or IPv6):
network.host: 0.0.0.0
network.publish_host: xxxxxxx
#publish_host 为主机 IP
# Set a custom port for HTTP:
http.port: 9201
# Set a custom port for TCP:
transport.tcp.port: 9301
# Pass an initial list of hosts to perform discovery when this node is started:
#master 节点 IP+端口
discovery.seed_hosts: ["xxxxxx:9301"," xxxxxx:9301"," xxxxxx:9301"]
# Bootstrap the cluster using an initial set of master-eligible nodes:
#master 节点名
cluster.initial_master_nodes: ["node_xxxxxx_9201","node_xxxxxx _9201","node_xxxxxx_9201"]
# Allow creating indices automatically:
action.auto_create_index: true
# Require explicit names when deleting indices:
action.destructive_requires_name: true
# Set to false to disable Watcher:
xpack.watcher.enabled: false
# Security settings:
xpack.security.transport.ssl.verification_mode: certificate
xpack.security.enabled: true
xpack.security.transport.ssl.enabled: true
xpack.security.transport.ssl.key: elasticsearch-7.9.3/elasticsearch-7.9.3.key
xpack.security.transport.ssl.certificate: elasticsearch-7.9.3/elasticsearch-7.9.3.crt
xpack.security.transport.ssl.certificate_authorities: ca/ca.crt
#Allow creating index in same host:
cluster.routing.allocation.same_shard.host: true
#discovery time:
discovery.find_peers_interval: 10s
discovery.request_peers_timeout: 60s
#fielddata:
indices.fielddata.cache.size: 10%
indices.breaker.fielddata.limit: 30%
#http:
http.cors.enabled: true
http.cors.allow-origin: "*"
http.cors.allow-methods: OPTIONS, HEAD, GET, POST, PUT, DELETE
http.cors.allow-headers: "Authorization, X-Requested-With, Content-Type, Content-Length, X-User"
3.7 IK 分词器安装
注:分词是在本地完成的,所以所有节点都必须安装。
下载 ES 对应版本的 IK,上传到 ES 安装目录,解压到节点 plugins 目录下:
unzip elasticsearch-analysis-ik-7.9.3 -d /app/节点目录/plugins/ik3.8 elasticsearch 启动
Elasticsearch 启动不能使用 root 用户,需要使用自己创建的用户:
cd /app/node_$IP_$PORT/elasticsearch/
./bin/elasticsearch -d
-d 后台运行
3.9 设置密码
cd /app/node_$IP_$PORT/elasticsearch
./bin/elasticsearch-setup-passwords interactive
依次输入各个用户的密码即可,密码统一使用生产环境密码。
3.10 检查 elasticsearch 状态
检查 Elasticsearch 集群状态:
curl -u elastic:xxxx -s http://$IP:9200/_cat/health?v检查 Elasticsearch 节点状态:
curl -u elastic:xxx -s http://$IP:9200/_cat/nodes?v
安装 Kibana
4.1 Kibana 安装配置
1)创建 kibana 安装目录
mkdir -p /app/kibana2)kibana 安装包下载及解压
官方下载地址:
https://www.elastic.co/cn/downloads/past-releases#kibana
解压安装包:
cd /app/kibana
tar -xvf kibana.tar
4.2 Kibana 参数配置
cd /app/kibana/kibana/config
vi kibana.yml

# Kibana is served by a back end server. This setting specifies the port to use.
#Kibana 访问端口
server.port: 5601

# Specifies the address to which the Kibana server will bind. IP addresses and host names are both valid values.
# The default is 'localhost', which usually means remote machines will not be able to connect.
# To allow connections from remote users, set this parameter to a non-loopback address.
#Kibana 服务器 IP
server.host: "xxxxxx"

# Enables you to specify a path to mount Kibana at if you are running behind a proxy.
# Use the `server.rewriteBasePath` setting to tell Kibana if it should remove the basePath
# from requests it receives, and to prevent a deprecation warning at startup.
# This setting cannot end in a slash.
#server.basePath: ""

# Specifies whether Kibana should rewrite requests that are prefixed with
# `server.basePath` or require that they are rewritten by your reverse proxy.
# This setting was effectively always `false` before Kibana 6.3 and will
# default to `true` starting in Kibana 7.0.
#server.rewriteBasePath: false

# The maximum payload size in bytes for incoming server requests.
#server.maxPayloadBytes: 1048576

# The Kibana server's name. This is used for display purposes.
#server.name: "your-hostname"

# The URLs of the Elasticsearch instances to use for all your queries.
#ES 主机
elasticsearch.hosts:
["http://xxxxx:9200","http://xxxxx:9200","http://xxxx:9200"]

# When this setting's value is true Kibana uses the hostname specified in the server.host
# setting. When the value of this setting is false, Kibana uses the hostname of the host
# that connects to this Kibana instance.
#elasticsearch.preserveHost: true

# Kibana uses an index in Elasticsearch to store saved searches, visualizations and
# dashboards. Kibana creates a new index if the index doesn't already exist.
#kibana.index: ".kibana"

# The default application to load.
#kibana.defaultAppId: "home"

# If your Elasticsearch is protected with basic authentication, these settings provide
# the username and password that the Kibana server uses to perform maintenance on the Kibana
# index at startup. Your Kibana users still need to authenticate with Elasticsearch, which
# is proxied through the Kibana server.
#超级用户用户名和密码
elasticsearch.username: "elastic"
elasticsearch.password: "xxxxxxx"

# Enables SSL and paths to the PEM-format SSL certificate and SSL key files, respectively.
# These settings enable SSL for outgoing requests from the Kibana server to the browser.
#server.ssl.enabled: false
#server.ssl.certificate: /path/to/your/server.crt
#server.ssl.key: /path/to/your/server.key

# Optional settings that provide the paths to the PEM-format SSL certificate and key files.
# These files are used to verify the identity of Kibana to Elasticsearch and are required when
# xpack.security.http.ssl.client_authentication in Elasticsearch is set to required.
#elasticsearch.ssl.certificate: /path/to/your/client.crt
#elasticsearch.ssl.key: /path/to/your/client.key

# Optional setting that enables you to specify a path to the PEM file for the certificate
# authority for your Elasticsearch instance.
#elasticsearch.ssl.certificateAuthorities: [ "/path/to/your/CA.pem" ]

# To disregard the validity of SSL certificates, change this setting's value to 'none'.
#elasticsearch.ssl.verificationMode: full

# Time in milliseconds to wait for Elasticsearch to respond to pings. Defaults to the value of
# the elasticsearch.requestTimeout setting.
#elasticsearch.pingTimeout: 1500

# Time in milliseconds to wait for responses from the back end or Elasticsearch. This value
# must be a positive integer.
#elasticsearch.requestTimeout: 30000

# List of Kibana client-side headers to send to Elasticsearch. To send *no* client-side
# headers, set this value to [] (an empty list).
#elasticsearch.requestHeadersWhitelist: [ authorization ]

# Header names and values that are sent to Elasticsearch. Any custom headers cannot be overwritten
# by client-side headers, regardless of the elasticsearch.requestHeadersWhitelist configuration.
#elasticsearch.customHeaders: {}

# Time in milliseconds for Elasticsearch to wait for responses from shards. Set to 0 to disable.
#elasticsearch.shardTimeout: 30000

# Time in milliseconds to wait for Elasticsearch at Kibana startup before retrying.
#elasticsearch.startupTimeout: 5000

# Logs queries sent to Elasticsearch. Requires logging.verbose set to true.
#elasticsearch.logQueries: false

# Specifies the path where Kibana creates the process ID file.
#pid.file: /var/run/kibana.pid

# Enables you to specify a file where Kibana stores log output.
#logging.dest: stdout

# Set the value of this setting to true to suppress all logging output.
#logging.silent: false

# Set the value of this setting to true to suppress all logging output other than error messages.
#logging.quiet: false

# Set the value of this setting to true to log all events, including system usage information
# and all requests.
#logging.verbose: false

# Set the interval in milliseconds to sample system and process performance
# metrics. Minimum is 100ms. Defaults to 5000.
#ops.interval: 5000

# Specifies locale to be used for all localizable strings, dates and number formats.
# Supported languages are the following: English - en , by default , Chinese - zh-CN .
#i18n.locale: "en"
i18n.locale: "zh-CN"
xpack.monitoring.min_interval_seconds: 60
xpack.reporting.capture.browser.chromium.disableSandbox: true
xpack.reporting.capture.browser.chromium.proxy.enabled: false
4.3 Kibana 启动
后台启动 kibana:
nohup ./bin/kibana &4.4 访问 kibana
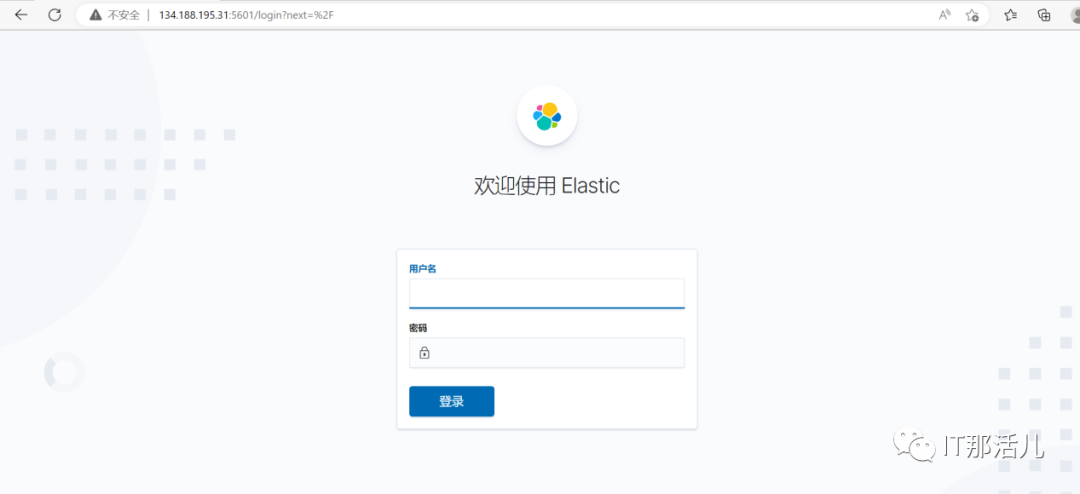
使用 Kibana 参数配置的 ip 端口,用户密码登录 kibana。
以上配置 kibana 的访问地址为 http://$IP:5601/

总 结:
本篇详细展示了 Elasticsearch7.9.3 版本的集群搭建步骤,可以直接快速的帮助刚接触 Elastisearch 的人员搭建起 ES 集群及可视化工具。
来源:“IT 那活儿”公众号

![【学习强国】[挑战答题]带选项完整题库(2020年4月20日更新)-武穆逸仙](https://www.iwmyx.cn/wp-content/uploads/2019/12/timg-300x200.jpg)


![【学习强国】[新闻采编学习(记者证)]带选项完整题库(2019年11月1日更新)-武穆逸仙](https://www.iwmyx.cn/wp-content/uploads/2019/12/77ed36f4b18679ce54d4cebda306117e-300x200.jpg)


